Showing posts with label bad idea. Show all posts

Wednesday, February 25, 2015

Cleaning Your Oven with Ammonia

"Easy Oven Cleaning Tip! No more harsh chemicals to clean your oven! Just use ammonia"


 Before I start, just to get this out of the way. YES, it does work. That's not what makes this a bad idea though. Ammonia is a household item that, as the decades pass, become rarely seen in most peoples houses. There's a very good reason for that actually. You see, as much as people assume a single ingredient cleaner is less harsh or scary than those modern cleaners that have a mile long ingredient list, that's not always the case. In fact, cleaning your oven with ammonia can be far more dangerous and harmful than the infamous spray-on oven cleaner most of us know.

 Let's look at this commonly touted pin/life hack.
  1. Preheat to 200° then turn off. 
  2. In a heat safe glass dish, fill with ammonia and set on middle rack (about 1 to 2 cups of ammonia). 
  3. In another dish, fill with boiling water and set on bottom rack (2 cups). 
  4. Leave overnight. 
  5. The next morning, remove dishes and wipe down the inside with a hot wet sponge


There's a few problems right off the bat with this: there's no mention whatsoever of using gloves or proper ventilation. Ammonia is highly caustic and toxic and can be extremely harmful to your skin, eyes and lungs. In fact a woman in Denmark was sent into a coma from cleaning her oven this way. Which brings up another fact to keep in mind - ammonia is sold in varying strengths, from 2% to 10%, in different countries. This little life hack is meant to be used with the weaker variants found in countries like the US. When you heat up ammonia it stands a good chance of vaporizing, which is extremely dangerous. Vaporized ammonia not only can burn your eyes and lungs, it can kill you if you inhale enough (by, say, sticking your head in an oven trying to clean it).

The fact is, ammonia really isn't better for you or the environment from other forms of oven cleaners. You might look at the ingredients of such products as Easy Off and balk at what it contains, but when you read over just how bad ammonia actually is, you quickly realize that one isn't better than the other. In fact, modern day oven cleaners tend to have far fewer--if any--fumes, something ammonia surely can't claim. Not only that, if you use various other cleaners in your house, you have to be extremely careful to never EVER mix ammonia with anything that contains bleach. That can cause a reaction that produces fumes that can quite literally kill you.

In my opinion, there's a very good reason many housewives started ditching such cleaners like ammonia in favor of the modern cleaners that started appearing in the mid century and soon took over our homes. All in all, this is just not a good idea. There are many other, safer ways to clean your oven.

Wednesday, April 30, 2014

Egg White Pore Strips


"DIY pore strip/mask with egg white and toilet paper! So trying this!"


This is part 2 of the DIY pore strips that I've been testing out. The first one didn't even set up right, but what about this one? First off - the link connected to this image, at least for me, was a spam site. Which isn't really adding to the credibility of this. Now the idea of eggs as a facial isn't new, and egg white masks have been popular for many, many years, but can you use them as a DIY pore strip? 


Well I tested this one out this weekend and it failed miserably. I don't know if it was the paper I was trying, but it became a soft gooey mess on my nose. I had to attempt this one a few times, because the toilet paper kept falling apart. I first tried to dip it into the egg whites, but it mushed up in the bowl, so I then smeared some of the egg whites on my nose, placed the paper on, and pat on more egg whites with a q-tip. However that caused it to goo up again and tear. So round three, I put egg whites on my nose and tried gently patting the toilet paper on. It didn't work all that well, but it did stay, and at that point I figured it was good enough. 


Facebook and Twitter fans got a sneak peak of this lovely image
I waited until it was hard and set up and peeled it off. I looked over what I peeled off my face but didn't see a single thing. It's hard to say if it was due to the texture/pattern inherent in toilet paper, but even on zoom I couldn't see a thing. 


Now here's where I add the disclaimer that I'm a skin care freak, in the same way some women are crazy about shoes, or makeup, or books, I'm that way about skin care. So my pores are generally kept clean and clear more so than the average person. But even the best skin has clogged pores and blackheads, so I went ahead and tried a Biore strip to compare what it pulled out vs the egg white/TP mix. This time around it was clear the strip pulled some gunk out of my pores. (if you look closely by my fingers in the photo below, you can see a few blackheads)


Ewww! 
So there you have it.  If you ask me, it doesn't work at all. Just testing out the two methods side-by-side, the feeling of pulling the biore strip off hurt more than the egg white one. Which sounds weird to say, but the hold, the adhesive of the biore one was clearly stronger than the egg whites were, so it seemed more likely to get the junk out of your pores better. 

I'll be testing out a few other methods in the coming weeks, so if you have any DIY pore strips you're curious about post the ideas over on our facebook or twitter!

Monday, April 28, 2014

Freeze Envelopes to Open

"If you seal an envelope and realize you forgot to include something inside, place it inside the freezer for an hour or two & it'll unseal easily."


Before anyone asks, yes I tested this out. On several different envelopes, in fact. I know there are different kinds that feature different glue, some you have to lick, some are self stick, some use thicker paper. Needless to say it didn't work at all. I'm not surprised, if it worked wouldn't we all run the risk of our mail popping open during the winter months? I tried this with newly sealed envelopes as well as various ones sent to me, and they all tore like regular unfrozen envelopes when I tried to ease them open. It seems most sites that recommend this haven't even tested it, and the one youtube video I found had the guy opening it, but he only sealed the most bottom tip of the envelope, which would be fairly easy to open gently without even freezing it. 

Honestly if you DO forget to add something to an envelope, and you've already added the stamp (and don't want to waste that by having to put everything into a new envelope) the easiest thing to do is to use a sharp knife, open it from the bottom carely, add what you need to add, then seal back up with tape. Not ideal, but it works far better than trying to pry open the seal. 

Wednesday, March 19, 2014

Freezing Candles to Prolong Burning and Preventing Drips

"freezing candles not only makes them burn slower, but can prevent them from dripping" 


This was a really interesting pin to test out. My original theory on this was honestly it wasn't going to make  difference, assuming that any temperature change freezing the candle would have made would quickly fade once it was brought out into a room of steady 70* temperature and lit. In fact, googling brought up a handful of sites that also agreed with this theory.  

As soon as I saw this pin I went to my drawer of candles and was ready to test it out. Yes, I really do have an entire dresser drawer dedicated to candles. Despite what you might read on pinterest, crayons and Crisco are no replacement for good candles. Unfortunately when going through my stash, I realized I mostly have hundreds of tea lights, larger scented decorative candles, and only two matching unscented plain wax votive candles. I wanted uniformity, candles of the same brand, same size, and unscented, with out coloring to assure nothing would get in the way of results. I would have liked to have had at least a half dozen to assure clear results, but I decided to test this out regardless.


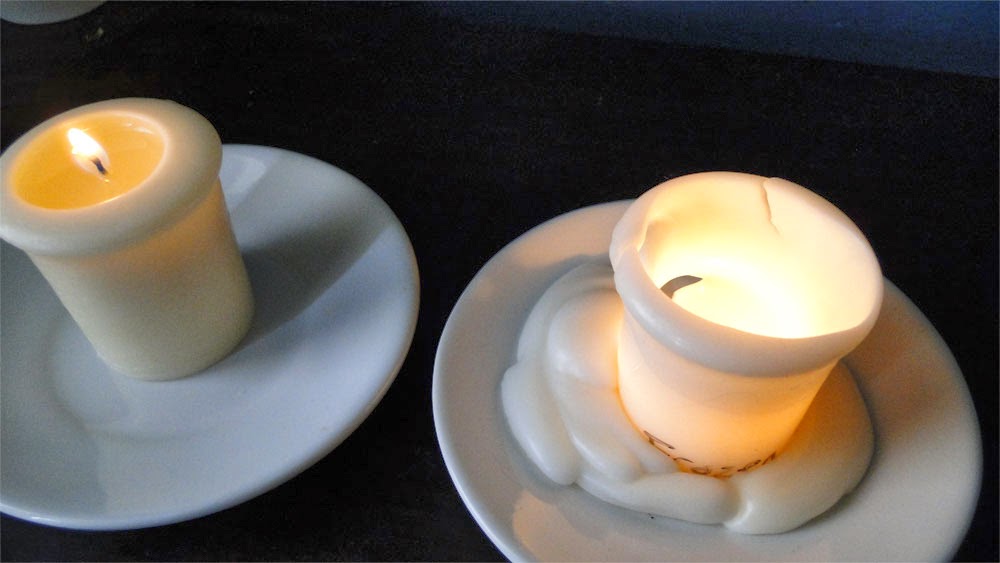
One candle was left in the drawer at room temperature, while the other one was left in the freezer for a week. I pulled out the candle and wrote "Frozen" on it, to assure the candles wouldn't get mixed up, and then placed them both on the same style of dish on my china hutch. They both lit just fine and I decided to check back in 30 minutes to see how they were doing. 


(Room temperature on the left, frozen on the right) 


I was amazed to see after the first 30 minute mark that the frozen candle appeared to be burning slower - the ring of melted wax was much smaller than it was on the room temperature candle. This was actually starting to look promising! 

However, when I checked back again in another 30 minutes, the tides had changed. The frozen candle still had a smaller area of melted wax, but had clearly burnt down faster than the room temperature candle. I kept checking back every 30 minutes, and it became clear that the frozen candle was actually burning faster then the room temperature one was, by quite a lot. 
You can see here the candles, side by side, after just about 2 hours of burning.


So I'm going to say this is a bad idea, most other articles on this I've read have said that it doesn't do anything as far as extending the life of the candles and how fast they burn, and if my test is a sign of anything, it actually makes them burn far faster. Honestly though I WILL be testing this out again with a larger amount of candles, the sheer difference in burning just the two candles makes me think this can't be a fluke. And drips? Yeah that's a no. The frozen candle ended up spewing and dripping wax so badly that I'm glad I had set it on a dish before lighting it. The room temperature candle didn't drip and didn't leak at all, though it also didn't burn down as far a the frozen candle did.

Monday, March 10, 2014

How To Obtain A Free Umbrella


No. No. Just no. Don't do this. Why? Because it's STEALING. Does this even need to be explained? 

Monday, February 03, 2014

Coconut Oil As Sunscreen

"Coconut oil is the original suntan/sunscreen lotion ... Coconut oil is a proven sunscreen that is still used by millions of people in the tropics as their sole source of protection from sunburn and skin cancer." 


I'll be the first admit that coconut oil IS nice, but unfortunately it gets more hype than is really needed. It's the new go-to oil of the millennium (older people will remember when olive oil was the go-to oil in the 80's and 90's). It's been the cure-all for everything from weight loss to eczema. But can coconut oil work as a perfectly natural non-toxic sunscreen? 

Ehhh, sort of. It depends entirely on the amount of SPF you're after. Will coating yourself with coconut oil prevent sunburn? To a degree: yes. It has a natural SPF of about 7. Yep, 7. Technically it's 7.11, which is actually lower than olive oil at 7.549, but higher than most all other oils. (source

SPF 7, however, is really, really low, and will not protect you all that much. Not only that, but you will need to reapply it constantly since it doesn't offer the staying power that commercial sunblock does. Even if you don't burn, you're still exposing your skin to dangerous rays. There's a lot of misinformation about SPF, I've heard everything from the "SPF tells you how long it lasts" (not true) to "all sunblock is the same" (also not true). The recommended SPF for most people is 30, and you should make sure that the sunscreen you're using not only blocks UVA but also UVB. (source

Another thing to take in account that this pin does not, is that everyone has different skin types. Coconut oil might work as a sunscreen for those native to the tropics, but that doesn't mean it's going to work as well if you're genetically low on melanin, like those who are from northern countries. Depending on the melanin levels in your skin, just trying this once could result in a nasty sunburn.

I get that a lot of people are trying to get away from chemicals and possibly harmful products, but at the end of the day, skin cancer caused by exposure to UVA/B rays is also a risk you have to consider when you're debating on which cream to reach for this summer.

Tuesday, October 01, 2013

Posts Revisited

Well there's been enough posts and wonderful fans asking a lot of questions and comments that I think it would be great to revisit some of the past posts I've done.


The first post I have new information on is the infamous Glow-In-The -Dark WalkwayThe mystery is finally solved! I've had a lot of really great suggestions from fans on how this photo was taken, but one commenter shared a link that fully explains it, directly from the photographer himself. What I had missed the first time around was a small faint water mark on the bottom right hand corner of the image. The photographer is David Tejada and famous for his lighting techniques. You can read the full interview here, but basically it was done with a ridiculously long shutter speed and a flash light in his own back yard. So there you go, straight from the photographer, this isn't glow in the dark paint. 


The second post I'd like to revisit is a Good Idea Friday I posted about last month. The "Ziplock Bag To Prevent Flies" has been hotly debated. Apparently Mythbusters did an episode on it, and they found it actually attracted more flies. However, a lot of people debate on the effectiveness of their experiment as they not only did this indoor with artificial lights, they left out the pennies. They also had a lot more flies than you would normally have, rotten meat, and a fairly small area in which they did the experiment (I love Mythbusters but agree they tend to go the extreme when testing things). Critics of their test believe these are enough to say the test failed because they weren't doing it correctly. You can read more about this over at Hoax Slayer. So for now, Good Idea still? Maybe. It is ridiculously cheap to do, and it may or may not work. And as tacky as it might look, it is slightly better than fly tape. Unfortunately I don't live in area with much of a fly problem, so I'm unable to test this myself, but I would love to hear from fans on this.

So that's our recap. Are there any posts we've done that you'd like to see us go more in depth on? Let us know! We're on twitter and facebook.

Wednesday, September 18, 2013

Glow Sticks and Nail Polish

"break a glow stick & put in clear polish" 


With Halloween coming up I've been seeing a lot more Glow in the Dark pins then you usually see. However as we learned with our other glow stick pins, not only will this not work, it's probably not the best thing for you. Not only that, glow stick formula typically doesn't glow that long once it's exposed to air. I was going to test this out and see how long it will glow, and if it would even set up properly but alas, I'm out of glow sticks. Even if it did set up right (instead of leaving your nails a big glowing gooby mess, which is what I think would happen) the glow would only last a short time, then you're left with a funky colored bottle of nail polish.

Instead, just buy glow-in-the-dark nail polish. A quick search not only pulls up a lot of different companies and online vendors that sell it, they also use the same exact image as the Pinterest pin! But I'd also like to point out that even with retail glow in the dark nail polish, without a blacklight you will not get the effect depicted here. That's not your standard glow-in-the-dark glow. 

Any fans out there with a spare bottle of nail polish and glow sticks want to test this out for me? I'm honestly really curious if it will even set up and harden right. 

Monday, August 26, 2013

Honey and Milk Pore Strips

"homemade pore stripes without gelatin or eggs. 1 tbsp honey mixed with 1 1/2 tbsp milk, microwave ten seconds or until warm (not hot) and apply to area with cotton ball or makeup brush. Let dry 15 minutes and peel off." 


I'm sure we've all seen a couple different ways to make homemade pore strips on Pinterest. Everything from gelatin to school glue seems to be mentioned. I've been meaning to test some of these out, but I've been wanting to wait until I  get a decent microscope so I can examine them closely enough to see if they really do work. 

However, this is one I don't even need to test to say it won't work. The pin suggestions a simple mixture of milk and honey. Looking over the link it goes to, the website suggests all it takes is 1 tablespoon of honey with 1.5 tablespoons of milk, microwave for 10 seconds, then dab onto your face where you need to clear your pores. Within 15 minutes it should set up into a hard layer that can be easily peeled off.

The problem? Honey doesn't set up like that, especially when mixed with milk. The only thing this will accomplish is a leaving your face a big gooey mess. Honey can and will solidify over time, but ironically as soon as you heat it up, it's going to go back to being liquid. Add liquid to that and place on a warm face, and there is no way this is going to set up enough to clear your pores. 

On the other hand, honey has been used as a skin treatment for thousands of years, and I personally love it as a face scrub (mix equal parts sugar and honey for a great DIY exfoliant), but a pore strip? I don't think so.

Monday, July 29, 2013

Alka Seltzer to Cure Urinary Tract Infections


This is one of those ideas that I'm sure we've all seen on pinterest, it's combined with a lot of other pretty bad ideas so I figured I would focus on them one at a time and explain why this is a really bad idea.  I can not stress enough that this is a bad and potentially dangerous idea. I hate dragging myself into the doctor's office and paying co-pays and prescription fees and the whole 9-yards over something like an UTI, and I'm all for home remedies for things like your basic cold or flu or second degree burns (my oven is out to get me I swear).  But certain conditions are nothing to play around with, and UTIs are one of them.

The idea behind this is that Alka Seltzer is alkaline in nature, so it will help balance out the pH of your urine, eliminating the infection. But it also contains aspirin or other pain relievers, so whether it actually helps with the infection or not, what it definitely does is help with the symptoms. So in a day or 2 of taking it you may feel better, but the infection may persist. This can be extremely dangerous because UTIs that are left untreated can move into your kidneys, causing kidney infections which are far more painful and difficult to treat and can lead to kidney failure.

Some doctors say alkaline can help with UTIs, whereas others say more acidic things (such as cranberry juice) can help. But the truth is that the pain relieving properties of Alka-Seltzer is going to mask any pain or discomfort that the UTI is causing, so it's going to be a lot harder to gauge if you're cured, or just no longer in pain. If you really want to give it a try before you can get into your doctor's, dissolving some baking soda in water would give you the same pH level changes as Alka-Seltzer would. The thing to remember is that it isn't just one strain of bacteria that causes UTIs, it's a dozen different kinds. One strain my respond better to acid, another to base. On top of that, your own personal pH level may even affect what works and doesn't, if it's going to work at all.

If you're looking for a home remedy, You can always try unsweetened pure cranberry juice, and up your water intake. There have been studies done on cranberry juice and though the studies are mixed, it does hold some weight to actually working, unlike Alka-Seltzer. Though if it lasts more than a few days, I can't stress enough the importance of seeing a doctor for UTIs. The longer you let it go the more likely it is going to move into your kidneys, and that is something no one wants to mess with.

Monday, July 15, 2013

Whole Egg Compost

"Fill pot with 2" of soil then place one uncracked raw egg in the pot. As it decomposes, it will serve as a natural fertilizer."

This is a pin that made me do a double take. You see, eggshells are honestly a great compost addition so it's easy to think maybe by tossing in the whole egg, it can work just as well. However, there's a handful of problems that can come up when you just toss a whole egg into compost, let alone in a pot you're planting in. 

Not only do whole eggs attract pests like raccoons, mice, rats and skunks, inviting them to dig up whatever you planted in order to get to the egg, but the egg will go bad before it starts to decompose. Quite a few people have mentioned how when they tossed a whole, uncracked eggs into their compost a few of them over time basically exploded. And that is one smell I wouldn't wish on anyone. Thoughts are mixed on if you should even add whole eggs to your compost pile; those who do it recommend either cracking and stirring it into the compost pile or burying it very deeply so pests can't get to it. That's not an easy solution however when we're talking about pots. 

All in all I'd say this is a bad idea. It's best just to stick with compost or if you feel the need to add eggs, use the shells only to be on the safe side. 

Wednesday, July 10, 2013

Cocoa and Lotion Self Tanner

"Homemade tanning lotion: lasts for 3 days.. It fades a little after every shower/bath. What to do:- 1-Get some cocoa powder-2tbsp. 2-any moisturiser you have 3-an empty bottle 4-cotton buds, or anything that can help you apply the cream 5-mix it all together you should end up with a brown mix. Don't worry, it won't be that dark on your skin. Good for super light girls!"

--- Edited Feb 2016 - at the request of the original owner of the image that is shared misleadingly on Pinterest, I have removed the image. She was concerned people would think her blog, or the image, was "false" The original image depicted a set of legs, showing a before and after with the after being noticeably tanner than the first image. It originally was posted on her blog, and was talking about a type of tanning cream she had used, to help accelerate the tan one gets from the natural sun. Somehow it of course found it's way to being shared on Pinterest, with a completely wrong and misleading idea that it was fake tanner, done with the above recipe, which is what this blog post of mine is addressing ---


A fan requested this one, and since it's the hey day of summer I know quite a few of you are probably wondering.. can you give yourself a great real looking tan with products from your kitchen? This is another classic example of a bad pin. Not only does it go with the "take something from your kitchen and smear it on you" idea, but after a quick search that isn't what the image is showing. 

and it's her before and after photos of using a tanning cream. Not a sunless tanning cream, but the kind you put on before you go sunbathing to give yourself a deeper tan. 

But, in the name of science, I decided to go ahead and test this out myself. I learned my lesson after the Brown Sugar Straightener post I did, and took photos to share with you all. I followed the instructions, mixing up some unsweetened cocoa powder and lotion and set to putting it on my legs. 

My legs : Before
The first thing I noticed was that it felt really gross and it was making me think I was smearing chocolate pudding on my leg. I took about a quarter size amount and started working it into my left leg. No amount of rubbing however, was getting it to rub in. So with my other leg I took just a dab, mixed it with some more lotion, and set about trying to rub that in. My right leg looked less dark, but no less streaky and dirty looking. I kept rubbing and rubbing both legs but finally gave up and took a photo. 

My legs : After
At this point I'm sure my neighbors are wondering why I'm laying in my yard with dirty legs taking photos of them, so I headed back inside to shower it off. On the way to the bathroom however my dog took a great interest in my legs, which is also another factor making this a bad idea -- if you have a dog, they might try to lick it off your legs, which is a really bad idea.

And for those wondering: it doesn't stain your skin like the pin suggests. It came right off in the shower with just your basic soap and bath poof. My legs are back to their typical color after just one shower.

So all in all, bad idea. It's not true, it's the old switcharoo -- the image is real, of a woman with a tan from a commercial product, not of chocolate and lotion. I know there are a lot of these ideas on pinterest that use coffee and tea, and I will be testing those out in the following weeks as well, so stay posted! 

Wednesday, July 03, 2013

Can You Cook Corn in Your Cooler or Ice Chest

"Cooler Corn! For when you've got a lot of people who want corn. Perfect for tailgating or BBQs."


Summer is here for a lot of us in the Northern Hemisphere, and I've gotten a lot of people asking me about cooler corn, or if you can safely cook corn on the cob in your ice chest or cooler. The idea is an interesting one; instead of heating up your house in the summer to get corn on the cob, or if you have to cook a lot for a BBQ or cook out, simply add it to a cooler, cover with boiling water and let it cook in the cooler. This idea is still highly debated among some. Does it work? Yes, it really does. But the problems that bring this into question is: can the heat leach chemicals or damage the ice chest? For the most part, yes. 

It seems the original image and idea came from a post over at the blogs on Bon Appetit. However, the original post didn't bring up any of  the concerns that make this a bad idea. (source

You see, most home coolers are made with PVC and other various plastics which often times contains BPA and other chemicals not made to be ingested. Coolers, when used properly, offer little risks of leaching chemicals into food since most people store their foods on ice, and often times in containers within the cooler. Once the plastic itself is heated though, the chemicals in the plastic begin to break down and leach into the water.  BPA is legal in the US for use in plastics, but due to the public concern of the possible link to serious health risks, more and more companies are no longer using it in plastic made for food use. Chances are though, your cooler isn't one of them. And there are other chemicals in plastic besides BPA to worry about. 

On top of that, certain coolers have been known to warp once exposed to high heat from the boiling water. I found a great forum post about this over at Home Brew Talks where someone was kind enough to actually send shavings of his coolers to be anylist in a lab. The results? The inside white plastic starts to melt at 212°F (100°C), which is boiling point for water. (source

So my conclusion? I'd honestly leave this one as a "last case scenario" idea. It does work, but you run a really good chance of ruining your cooler or have chemicals you really don't want leaching into the water. Not a single cooler manufacturer backs this suggestion, as every cooler is meant to cool items -- it's in the name of the product. However, this does beg the question - if not in your cooler, than what? I'm rather curious to see if this sort of thing would work in a stockpot with lid. Corn can cook quickly and easily,  so I imagine any large basin with lid would work. Just make sure it's food grade material and preferably not plastic. 

Wednesday, June 26, 2013

Shattered Mirror Floor

"Broken glass floor - great for a bathroom floor or countertop. Just lay broken mirrors on the floor and top with polyurethane" 


I don't even know where to start with this one. That's not what this is an image of. The image quality makes me believe it came from a magazine of sorts, but I'm having a hard time finding the source. My first thought when seeing this image is that it was an artsy spread of some sort in a magazine, not some great DIY home design project.

I'd like to point out there is no sealant or polyurethane in that photo, it's just broken mirrors. Also, as someone who has done a lot of refinishing including the floors of my house, polyurethane is an extremely thin sealant - I think what the creator was the pin was thinking more of would be an epoxy resin, which on the floors wouldn't work easily, takes days to set up, and bubbles like crazy unless it's set just so or with a heat source. 

So yeah, this isn't even doable if you ask me, at least not as a DIY home project. 

Monday, June 24, 2013

Crayons As Makeshift Candles

"In an emergency, a crayon will burn for 30 minutes." 


Ok. I'm trying to get through this post without laughing. For some reason this image alone makes me laugh every single time I look at it. I also thought I would try something different and do a video post for this bad idea. Because honestly, this is a REALLY bad idea. 


UPDATE 1.24.15
We're working on a new format for the blog and are currently having problems getting the video to play properly on mobile devices.
Here is a direct link.


So lets get down to why you shouldn't do this. On youtube I found just a few videos of people attempting this. As I showed in the video, I did one crayon with your basic lighter, and another with my work torch. I actually seemed to have had better luck with my lighter than I had previously seen on other youtube videos, but the torch, due to its higher temperature and more focused flame, got the job done quicker. My theory on why this works is that it's like a reversed candle - the paper on the outside of the crayon acts as a wick, and the melting wax inside the crayon helps coat and protect the paper from just going straight up into flames. 

But they don't burn for 30 minutes. Maybe 10-15 if you're lucky. In my video I show how at the 5 minute mark it's already halfway burned though. Also, the image above has it sitting on someone's carpet. Which is just remarkable as far as "really bad ideas" go -- not only are you faced with dripping wax on your carpet, most carpets are made with synthetic fibers and when they catch fire, it's not good. The wax itself is just a simple paraffin wax, which is commonly used in candles and even foods, but this experiment caused a lot of smoke to form, leaving my studio smelling my melted crayons for quite some time. 

All in all, this is just not a good idea. The crayon itself isn't stable, making it very prone to tipping or falling over, it doesn't last long, and it puts off a lot of smoke. I can't think how this would ever be a good idea. In a pinch you're better off even making a homemade oil burning lamp with olive oil than you would this. But the majority of people generally keep candles, lanterns, and flashlights on hand in case of power outage. 


Wednesday, June 19, 2013

Toilet Seat Covers to Blot Oily Face

"Use a toilet seat cover to blot the oil from a greasy face."

So the idea behind this suggestion is that the thin, dry tissue like seat covers in bathroom stalls can act the same way as facial blotting papers can. Sure the paper texture is similar enough, that it might just work. That's not the problem with the suggestion though. So what is? Well it's a commonly known fact (or at least I assumed it was) that there is a spray radius from toilets. It's one of the reasons they suggest you always put the seat down before flushing. In fact, the Mythbusters did a show on this. Their results? It's true. Not only that, these seat covers are usually found in public restrooms, where there aren't lids for the toilets. 

So you're best bet is to skip on trying to use these are facial blotting paper. Stick with using rice paper which works great and can be bought online for fairly cheap. 


Wednesday, May 22, 2013

Jello Lip Stain

Use Jello as a lipstain! Pour the powder mix into a bowl and moisten a Q-Tip with water. Then, being very careful not to use your fingers since the red stains stay put, dip the Q-Tip into the powder and apply it directly to your lips.


This has to be one of the more stranger pins I've found on pinterest. It's not that it wouldn't work, but it more or less confuses me. The dye in jello is the same used in food coloring. It would probably be easier to carry a small bottle of red food coloring and dab that onto your lips instead of carrying around a packet of powdered jello. If you're looking for a more natural route, you could probably keep a slice of raw red beet in a zip top bag and use that instead. 

So what do you think? Anyone wanting to trade in their favorite lipstick for a packet of jello? 

Wednesday, May 15, 2013

How To Heal A Sunburn


"Heal A Sunburn In ONE Night! 3-4 in piece off an aloe vera plant, sliced in half 1 Tbsp coconut oil, in liquid form 1/2 – 1 tsp raw honey or propolis."


Well summer is nearly here, so now would be a good time to explain why not to do this. The pin and blog it links to says you can heal even the worst sunburn with a simple mixture of aloe, coconut oil and honey or propolis. 

Now I will agree that aloe is the best thing you can use on a sunburn. The other ingredients however are what makes this a truly awful idea. I can not stress enough NEVER put oil or lotions on a sunburn. Why? Well they trap the heat in. As simple as that. Even after you've removed yourself from the sun, your skin once burned will remain hot - you can touch your sunburn and feel the temperature difference between it and your regular skin.

Adding oils, lotions, and honey of all things is only going to keep your skin hot. I know there is a rather big following especially online who claim coconut oil is a miracle and can do anything, but lets get logical here - oil is oil. Yes I know the general makeup of butter vs coconut oil is completely different, but on a burn they will have the same effect  We laugh at the 100 year old idea of rubbing butter on a burn, so why turn around and put the modern day equivalent on your skin? Coconut oil will have the same effect as any oil or lotion on a sunburn. 

Now I will say, that after the sunburn has had time to cool, say in 24 hours, and it's no longer hot and it's starting to feel dry and itchy? By all means try coconut oil! Keeping your skin hydrated once the burn has had a chance to cool off is perfectly fine, and can help in the healing process. But the hours after you first got your burn and your skin is still hot is NOT the time to start adding oils and lotions to your skin. Honey is no different in it's ability to trap heat into your skin. I know there is a large body of studies that point to honey having anti-inflammatory and antibacterial properties to them, but all in all between the mess and the stickiness it's pretty low on the 'things I want to rub on my skin' list. You're better off taking an ibuprofen and drinking several glasses of water. (Hydration starts from the inside - when you get sunburn you need to up your water intake!) 

So what can you do when faced with reddening skin from a day out? The very best thing you can do for a sunburn is to soak in a cool tepid bath with ground oatmeal (you can either buy it over the counter or make it yourself in a food processor, nothing fancy just ground oatmeal until it a powder. Yes it really is that easy! You can add herbs like lavender or chamomile if you're feeling fancy.) and once out, pat dry and apply aloe. My go to aloe is the mentholated kind with added lidocaine. Aloe can be applied many times throughout the evening too, so don't just apply it once and figure that's good enough, the more times you apply it, the better chance you have at healing you sunburn. Also like I said earlier - drink water. Lots of water. You're probably dehydrated from being out in the sun and hydration is very important to healing your skin.  


Wednesday, April 17, 2013

Baking Soda Microdermabrasion Scrub

"DIY Microdermabrasion - mix 3 parts baking soda and 1 part water into a paste and apply in a circular motion and rinse" 


Ah, this. This is one of those pins that inspired this blog to begin with, so I should probably do a formal post about it. We've all seen it, a lot of us have probably tried it. So why is this a bad idea?

Because it's the gold pants of the beauty world. Let me explain  This is a not-the-worst-idea-but-I-still-can't-call-it-good-idea idea.  Maybe if you're young with oily skin, and by some off chance it doesn't make you break out. So this will work on about .001% of people. Like how very few people can wear gold pants and look not ridiculous in them. For the rest of us: set down the baking soda and step away from the pants, because it's a bad idea.

I actually had a hard time even finding a photo  
of someone looking good in gold pants!

Why? Well you see, skin has a natural pH to it. If you see a dermatologist it's one of the first things they will address. If your skin's pH is off,  chances are you're fighting dryness or oily skin and breakouts. Normal range is around 4.5-6.5 which mean it's a bit on the acidic side - which is good. Its good to maintain a healthy low level of acidity to fight off bacteria and other things. Baking soda, as we all know from chem class, is a base, meaning it helps neutralize acid. Baking soda's pH is around 7.5, meaning it can help lower the acidity of your skin if you use it, which is something you most likely don't want.

On top of that, baking soda is really really good at drying your skin out. Something you might not be too worried about when you're 19, but if you're up there in age, trust me, you worry about it. I've seen the same baking soda scrub idea also pinned with the suggestion of using coconut oil in place of water (again with the coconut oil!) but having tried it myself I can assure you - it will still leave your skin feeling very dry and tight, and greasy for the first hour or so. And smelling a bit like a good stir fry.

I've read a few suggestions saying to use the base pH of baking soda to help with oil production, but unfortunately for a lot of people it will have opposite effect  You see, often times your skin is oily because it's too dry. Yes, I know, that sounds crazy. But listen: your skin needs a balance of pH and oil to it. If your skin is dry from ether the products you're using, washing too much, sun, cold, living in a dry climate, etc., your skin goes into over drive. It starts producing more oil to better protect itself. And here's where a lot of people make the mistake of reaching for a deep cleansing oil-removing soap or scrub. So you just dried your skin out even more, causing your skin to produce MORE oil. You see the cycle. So the first thing you need to do if you have oily skin is to pamper and baby your skin with gentle cream based cleanser and a gentle moisturizer to see if that helps.

So there you have it. Baking soda works, kind of, but it also dries your skin and screws up your pH balance, which can cause breakouts and dry and/or oily skin. For every person you meet who swears by this, chances are you'll find a dozen more who had issues when they tried it. All in all, it's a bad idea.

Monday, April 01, 2013

Egg Membranes to Stop Bleeding and Heal Wounds


"Who knew? If emergency occurs... While the blood is gushing - hold pressure and crack open an egg. Peel that membrane off and put it on the wound (continue holding pressure) The membrane will harden and keep the wound closed until you can get to the ER for stitches. My grandma taught my mom this and it works!" 


I don't even know where to start with this one. I guess I'll start with - gush? If you have a wound that is gushing, you need stitches, not an egg. But does it work? Well, yes apparently it DOES work; the membrane is so thin that when applied it will stick to your skin, and when dry it forms a tough glue-like barrier. But whether it works or doesn't isn't the problem -- Salmonella is. You see, most people think you can only get things like salmonella through eating contaminated foods, but you can in fact also get it via open skin and wounds. It's not a common form of contracting salmonella, but adding a possibly infected egg membrane to your cuts is just asking to gamble with statistics on this. Yes, you are more likely to get it from eating contaminated foods, but why risk being one of the few who get's it from an open cut because you couldn't bother to find a bandage?

There has actually been studies done on this (source: Pubmed), which is what a lot of people who swear by this bring out every time this idea is debated. It was used and compared to other forms of skin grafts for burn patients. However, the study only contained 18 patients and anyone who studies research will quickly point out that 18 is a VERY low number for a study. This study was also done in a controlled environment of a hospital with irradiated eggs with gamma radiation to kill off things like salmonella and other bacteria - not just your basic eggs from the supermarket. I know some people might think "What are the risks really?" But an estimated 142,000 Americans a year come down with salmonella - is it a risk you really want to take just to heal a wound?

All in all, unless it's the end of the world and zombies are rising up and there is a bizarre shortage of band-aids and medical professional arounds, you can do this, but something as simple as Super Glue would work JUST as fine, without the risk of introducing bacteria to the wound. In fact they even make skin glue for this purpose. It comes with it's own set of risks - as it can trap in dirt, foreign objects, and bacteria into the cut, causing infection - so use at your own risk. And if you have a wound that is "gushing" as the pin states, you're better off getting yourself to the nearest Urgent Care or ER then you would be sticking raw egg to your wounds.