Showing posts with label misleading. Show all posts

Monday, March 02, 2015

Foot Shape to Reveal Your Heritage


I'm sure we've all seen this one make the rounds all over the internet, from Pinterest to Facebook. But there are so many problems with this I don't even know where to start. 

First off, this really only seems to address European decent. What about Asian, or African, or you know, the various North or South Americas? Second off, the shape of one's feet can vary from family member to family member. Just in our family alone, I have "Egyptian," my husband has "Greek," but our kids? One is apparently Egyptian, the other is Germanic.

The truth is: the shape of your feet can't really tell you what your ethnic roots are any more than saying the shape of your hands can. There has been studies done to see if toe length can show genetic traits, and the ruling is no, the shape of your toes really aren't a good indicator of genes, let alone something like your 'roots' or heritage. Where as genetics and heritage can play a role in certain bone structure, it really isn't a good indicator when it comes to your feet.

Wednesday, June 18, 2014

Fire Glass - Amazing Flammable Glass to Replace Wood

"Fire glass produces more heat than real wood, and is also environmentally friendly. There is no smoke, it's odorless and doesn't produce ash. You are able to stay toasty warm without cutting down trees and the specially formulated glass crystals give off no toxic deposit.."  


I actually stumbled across this on a buzzfeed article about pinterest (I will just come out and say it, if you want bad pinterest ideas, buzzfeed is a hotbed of them) and knew right away that couldn't be right. I searched pinterest curious to see how often this is actually pinned, and was floored that the above image has been repinned nearly 5,000 times from one pin alone.

A quick Google search later and sure enough, I found the website for Fire Glass. Pulled directly from their FAQs: 
"Fire Glass is tempered glass that is used in fireplaces and fire pits to increase vibrancy, reflection and color. Tempered glass is tumbled and polished to prevent sharp edges and injury. The glass is designed for gas fire pits and gas fireplaces to tolerate high temperatures without melting, burning or discoloring when used as recommended. The glass does NOT create toxic fumes, smoke, ash, or soot... You can use fire glass with both propane and natural gas. "

What does all that mean? It's not a "flammable glass". It's a filler used in gas or propane fireplaces and fire pits; instead of lava rocks or fake wood, you add Fire Glass. The glass itself isn't flammable and won't do anything if you try to set it on fire. It's not a replacement for real wood in a wood burning fire pit. It is quite pretty and I can see the appeal, but unless you have a gas burning pit, it's not going to do anything.

Monday, June 16, 2014

Iodine and Baby Oil Hair Remover

"1Tbsp of iodine 2% 1 Cup of baby oil Rub your hairy area with the mixture and let set for only 5 minutes. Then gently wipe away with a damp cloth. Viola!!!! NO MORE HAIR!"


I've had a lot of people asking about this one. My first step was try to locate the source of this image. I was unable to find the source though so if anyone knows, please let me know. But right off the bat, the leg shape, muscle tone, as well as the hair growth made me believe this was a man's leg. Not that men can't and don't remove leg hair, but if you look closely you'll also notice a rather large scar running down the knee of the hairless leg.  We often see similar ideas where an image of one thing is used to promote a completely different idea, like the spray paint light bulbs, brown sugar for hair straightening, coffee for hair remover, and the fake tan from cocoa powder, just to name a few of the ones this blog alone has disproven. 

Which leads me into why I don't believe this is even remotely plausible as a pin. You see, it's common for surgeons to scrub an area before surgery with iodine. If iodine was such a remarkable hair remover, why would they bother doing pre-op shaving? Anyone who has had surgery on an area with hair growth can tell you that the area is shaved before hand. Wouldn't doctors, of all people, look for time-saving methods and skip the shaving if iodine could double as an antiseptic AND hair remover? 

Not only that, but a lot of results when you google iodine and mineral oil pulls up people talking about how back in the days of bottle brown tans, this was one of the go to tanning methods. If it worked as a hair remover, I think it would be more commonly known today, and I also doubt a lot of men back in the day would have used it as often as they did. Anyone who has used iodine can attest to how it stains the skin, however the hairless leg seems oddly void of any kind of staining. 

And finally, chemically, there is NOTHING in these two that would cause such a reaction as hair loss

But in the name of science, and because I know you love proof, I tested this pin out just for the blog. Since it's summer though, my legs get shaved regularly, so I brought in a stand in for this pin. Meet the other half of "us" here at Don't Pin That, and my editor in chief, Tay.


Tay, bless him, is hairy. Very much like the original image. So who better to test this pin out? 


Tay was a good sport spending his father's day evening letting me test this out. I mixed up the mixture and then tucked a towel under his leg incase it dribbled onto the sofa, and applied it.


Then we waited. The pin says 5 minutes, but since there was a bottle of wine and an episode of Conan to catch up on, it turned out to be more like 15 for us. Gently rubbing it away didn't do much, so I then scrubbed. The hair however, remained firmly attached to his leg: 


His very yellow stained leg I might add. 

So there you have it. No, this doesn't work. There's no way this would work chemically or even logically. I have no idea what the source of the original image is, but it's not from some miracle iodine hair remover. 

Have an idea you want us to look into? Contact us! We're on facebook and twitter - leave a message, an pin, or just say hello. 


Monday, March 03, 2014

Cinnamon Roll Crust

"How great is this? Just use store bought cinnamon roll dough in place of crust for your pies!"


A fan submitted this one and had the same concerns I did when reading this. If you've ever made cinnamon rolls before, even store bought ones often found in the chill case, they tend rise when baked. So either the rising roll crust is going to cause all the amazing pie filling to leak out the sides (and onto the oven floor) or it's going to remain a dense, chewy undercooked mess. 

Luckily I was able to track down the original source of the image, and wouldn't you know it? That's not what this is an image of. Over at Tablespoon, Stephanie shares a great recipe on how to make a pie with a faux cinnamon roll crust made of rolled up crust, spices and sugar. Since it's crust, it won't rise like the supermarket rolls will, so your pie filling will stay in place. You can read more of her recipes on her blog at Girl Versus Dough

So, is anyone game to try this? I'd try one with cinnamon rolls from the store, but I made a new years resolution not to set my oven on fire for this year. If you try ether examples though, let us know! Share photos or stories on our facebook and twitter

Monday, October 28, 2013

Glow In The Dark Planters

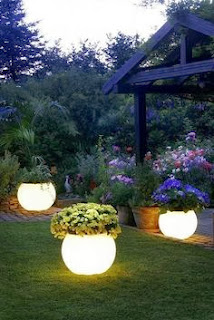
"Buy a flower pot that you really like and use Rustoleum's Glow-in-the-dark paint to paint the pot. During the day, the paint will absorb the sunlight and at night the pots will glow." 


I'm completely convinced  that people who pin and share these things on Facebook have never actually tried glow-in-the-dark paint. The first thing wrong about this image is that well, it's not night. At all. The second is the amazing glow the pots are putting off, enough to even illuminate the grass. Glow-in-the-dark paint won't do that. 

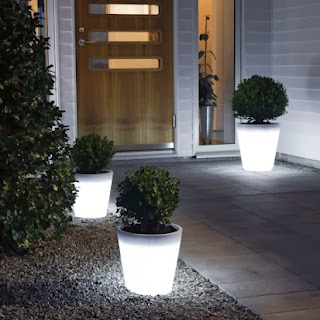
You see these aren't just painted pots, they are LED-lighted pots. I've been trying to track down the direct source of  this image, but haven't been able to. However I have found enough variously similar planters to show you, like these from Konstsmide, a German light manufacture:


And just like in other various "Glow-in-the-Dark" pins, people don't seem to take in account that glow in the dark paint is very green/yellow. In fact there is a great review and write up about two different popular glow-in-the-dark paints at Observation Blog. Here is his 2 examples of the paints, which even with 8 hours of charge were barely glowing, surely nothing strong enough to light up the grass around it. 

So once again, put down the paint, people. Sadly this isn't even near what the original image is. And please let me know if anyone knows the source of the original image! I'd love to email the photographer or landscapers who did this and give due credit. 


Monday, October 14, 2013

I Fear The Day.. By Einstein (Meaningful Misquotes #3)


I'm sure we've all seen this one. Its usually pinned or shared on facebook, sometimes with an image of young teens bent over their phones, not talking with each other unless it's through text messages. People who pin it will often comment things like "SO TRUE!" 

The problem is of course, there is no record of him saying this. Einstein has to be one of the most misquoted historian figures of all times (along with such people as Plato). The quote unfortunately can not be traced back to him, and is not found in The Ultimate Quotable Einstein by Alice Calaprice, who is a renowned Einstein expert. 

A bit of research also pulled up this collection of tweets from Waldo Jaquith where he was able to track down the original source of the quote, and it appears to have originated from a downloadable (and questionable) app for your phone. The app in no way sites it sources for the quote, so I'd be pretty skeptical about ANY quotes from this app. 

Wednesday, July 24, 2013

Baking Soda and Vinegar Instead of Helium to Inflate Balloons

"No helium needed to fill balloons for parties.....just vinegar and baking soda!"

This is a pin that if anyone took middle school science class, they shouldn't be pinning. Why? Because you can't just make up helium. Can you use baking soda and vinegar to fill balloons? Sure. But it's not going to float like helium will. You're better off just blowing them up with your own breath, unless you are planning on using it as a science experiment for kids. Which, come to find out, is what the image is actually depicting. 

A quick search and I found the source of the image. Over at the blog Mom to 2 Posh Lil Divas, she writes about a common trick of using vinegar and baking soda to fill a balloon, showing off the gas the chemical reaction produces. In fact, she has even added a disclaimer on the post explaining that this will not produce helium. Helium is a naturally occurring gas, you can't just make it. It's number 2 on the periodic table of elements, meaning it's lighter than air (which is primarily made up of heavier oxygen and nitrogen), which is why when you fill a balloon with helium, it floats instead of sinking like if it were filled with air. (The only reason an air balloon sinks in the first place is because you're loading it up with compressed molecules, making it heavier than the air around it.) The gas produced from baking soda and vinegar, however, is your run of the mill carbon dioxide. Since carbon dioxide is heavier than air, it won't float. In fact, technically it will be heavier than if you simply filled it normally with air.

So there you have it, this is a great experiment for the kids, but don't think this is going to magically replace helium in balloons

Wednesday, July 17, 2013

Galaxy or Aurora Cocktail

"This cocktail isn't Photoshopped. With a blacklight and the right ingredients, you can actually make your own at home."


I'm honestly flabbergasted at the amount of times I have seen this pinned by people who honestly believe if they follow the drink recipe, it will come out looking like this. This is pure photoshop people. In fact, the original artist of the image is Melody, who was so sick of seeing her image stolen and used without permission she's covered the original on her page with about a dozen different watermarks. 

But is it a real drink? It sure is! I can't vouch for the flavor as I haven't tried it yet, but this is the recipe via Campus Companion : 
  • 9 liters of tonic water
  • 3-4 bottles of rose mojito passions OR 3-4 cans of pink lemonade concentrate
  • Ice 


And the results? It looks something like this: 


As cool as that is, it's not a galaxy in a glass. It's because the tonic water contains quinine, which glows under a blacklight. You can make a lot of different cocktails and drinks that glow, as long as you use tonic water and have a black light handy. 

Wednesday, July 10, 2013

Cocoa and Lotion Self Tanner

"Homemade tanning lotion: lasts for 3 days.. It fades a little after every shower/bath. What to do:- 1-Get some cocoa powder-2tbsp. 2-any moisturiser you have 3-an empty bottle 4-cotton buds, or anything that can help you apply the cream 5-mix it all together you should end up with a brown mix. Don't worry, it won't be that dark on your skin. Good for super light girls!"

--- Edited Feb 2016 - at the request of the original owner of the image that is shared misleadingly on Pinterest, I have removed the image. She was concerned people would think her blog, or the image, was "false" The original image depicted a set of legs, showing a before and after with the after being noticeably tanner than the first image. It originally was posted on her blog, and was talking about a type of tanning cream she had used, to help accelerate the tan one gets from the natural sun. Somehow it of course found it's way to being shared on Pinterest, with a completely wrong and misleading idea that it was fake tanner, done with the above recipe, which is what this blog post of mine is addressing ---


A fan requested this one, and since it's the hey day of summer I know quite a few of you are probably wondering.. can you give yourself a great real looking tan with products from your kitchen? This is another classic example of a bad pin. Not only does it go with the "take something from your kitchen and smear it on you" idea, but after a quick search that isn't what the image is showing. 

and it's her before and after photos of using a tanning cream. Not a sunless tanning cream, but the kind you put on before you go sunbathing to give yourself a deeper tan. 

But, in the name of science, I decided to go ahead and test this out myself. I learned my lesson after the Brown Sugar Straightener post I did, and took photos to share with you all. I followed the instructions, mixing up some unsweetened cocoa powder and lotion and set to putting it on my legs. 

My legs : Before
The first thing I noticed was that it felt really gross and it was making me think I was smearing chocolate pudding on my leg. I took about a quarter size amount and started working it into my left leg. No amount of rubbing however, was getting it to rub in. So with my other leg I took just a dab, mixed it with some more lotion, and set about trying to rub that in. My right leg looked less dark, but no less streaky and dirty looking. I kept rubbing and rubbing both legs but finally gave up and took a photo. 

My legs : After
At this point I'm sure my neighbors are wondering why I'm laying in my yard with dirty legs taking photos of them, so I headed back inside to shower it off. On the way to the bathroom however my dog took a great interest in my legs, which is also another factor making this a bad idea -- if you have a dog, they might try to lick it off your legs, which is a really bad idea.

And for those wondering: it doesn't stain your skin like the pin suggests. It came right off in the shower with just your basic soap and bath poof. My legs are back to their typical color after just one shower.

So all in all, bad idea. It's not true, it's the old switcharoo -- the image is real, of a woman with a tan from a commercial product, not of chocolate and lotion. I know there are a lot of these ideas on pinterest that use coffee and tea, and I will be testing those out in the following weeks as well, so stay posted! 

Monday, July 08, 2013

How to Detect Two Way Mirrors

"A Mirror or a 2-Way Glass? How can you tell when you are in a room, restroom, motel etc. with a mirror or a 2-way glass...try this to test mirrors in fitting rooms and restrooms..." 


This is a common urban legend that has left the confines of email chain letters and found it's way into Pinterest. To quote the website this image was pinned from "Just conduct this simple test: Place the tip of your fingernail against the reflective surface and if there is a GAP between your fingernail and the image of the nail, then it is GENUINE mirror. "

It seems like a simple enough test that we can all do once we're in a fitting room, to see if there are cameras hidden behind the mirrors. But unfortunately, it doesn't work. Simply holding your finger up to a mirror and checking for gaps isn't going to let on what kind of mirror you're looking at. A lot of different factors can go into if there will be a gap or not when you press your finger to the mirror. Lower quality mirrors won't always give you a gap, even though they are genuine mirrors. 

There are a couple of tricks you can try when trying to figure out if you're being spied on, the easiest and most accurate is to simply cup your eye with your hands and look into the mirror - this will allow you to limit the light source on your end, allowing you to be able to see the other side. Another hint is if the mirror is hanging on a wall instead of being set into a wall. (source)

Another thing to take in account is that the laws regarding cameras in fitting rooms varies greatly depending on the state or country you live in. Some allow them only in the walkway, some in the rooms, and some not past the entrance of the fitting rooms. The best thing you can do is learn your local laws before you start trying to poke every mirror you see. 

Monday, July 01, 2013

Landry Basket to Make Polka Dot Walls


"polka dot walls! Make a stencil from an old laundry basket" 


Today's post is what I wouldn't call a bad idea, but that's just not what this is an image of. I too was tricked by this post as first, it's been making the rounds of pinterest for sometime now. But I got to thinking ... laundry baskets are made of fairly thick plastic, which would make for a pretty bad stencil. Anyone who has ever worked with stencils knows that the thinner the plastic, the better. It helps keep the stencil flush with the wall and prevents paint from dripping or leaving the boundaries of the stencil. A quick search later and I realized why that didn't seem right with me: it's not a stencil made from an old laundry basket at all. 

Over at The Lil House That Could, you'll find the original source of the image. It's not a laundry basket, just a traditionally made stencil. 

Polka Dot Closet : The Lil House That Could 

I'm all for turning everyday items into something else (the cut bottoms of celery make the prettiest rose pattern for stampings!) but when it comes to stencil work, thinner is better, so I'd set the laundry basket down and just use a traditional stencil.  


Wednesday, June 26, 2013

Shattered Mirror Floor

"Broken glass floor - great for a bathroom floor or countertop. Just lay broken mirrors on the floor and top with polyurethane" 


I don't even know where to start with this one. That's not what this is an image of. The image quality makes me believe it came from a magazine of sorts, but I'm having a hard time finding the source. My first thought when seeing this image is that it was an artsy spread of some sort in a magazine, not some great DIY home design project.

I'd like to point out there is no sealant or polyurethane in that photo, it's just broken mirrors. Also, as someone who has done a lot of refinishing including the floors of my house, polyurethane is an extremely thin sealant - I think what the creator was the pin was thinking more of would be an epoxy resin, which on the floors wouldn't work easily, takes days to set up, and bubbles like crazy unless it's set just so or with a heat source. 

So yeah, this isn't even doable if you ask me, at least not as a DIY home project. 

Monday, June 24, 2013

Crayons As Makeshift Candles

"In an emergency, a crayon will burn for 30 minutes." 


Ok. I'm trying to get through this post without laughing. For some reason this image alone makes me laugh every single time I look at it. I also thought I would try something different and do a video post for this bad idea. Because honestly, this is a REALLY bad idea. 


UPDATE 1.24.15
We're working on a new format for the blog and are currently having problems getting the video to play properly on mobile devices.
Here is a direct link.


So lets get down to why you shouldn't do this. On youtube I found just a few videos of people attempting this. As I showed in the video, I did one crayon with your basic lighter, and another with my work torch. I actually seemed to have had better luck with my lighter than I had previously seen on other youtube videos, but the torch, due to its higher temperature and more focused flame, got the job done quicker. My theory on why this works is that it's like a reversed candle - the paper on the outside of the crayon acts as a wick, and the melting wax inside the crayon helps coat and protect the paper from just going straight up into flames. 

But they don't burn for 30 minutes. Maybe 10-15 if you're lucky. In my video I show how at the 5 minute mark it's already halfway burned though. Also, the image above has it sitting on someone's carpet. Which is just remarkable as far as "really bad ideas" go -- not only are you faced with dripping wax on your carpet, most carpets are made with synthetic fibers and when they catch fire, it's not good. The wax itself is just a simple paraffin wax, which is commonly used in candles and even foods, but this experiment caused a lot of smoke to form, leaving my studio smelling my melted crayons for quite some time. 

All in all, this is just not a good idea. The crayon itself isn't stable, making it very prone to tipping or falling over, it doesn't last long, and it puts off a lot of smoke. I can't think how this would ever be a good idea. In a pinch you're better off even making a homemade oil burning lamp with olive oil than you would this. But the majority of people generally keep candles, lanterns, and flashlights on hand in case of power outage. 


Monday, May 20, 2013

Glow in the Dark Bubbles


"Cut open glow sticks & pour them into bubble solution. Glow in the dark bubbles. I like the idea for summer nights & camping"


Who hasn't seen this idea going around not just Pinterest but Facebook and the like? Looking at the picture, this looks like this would be true. And it is, sort of. You see, you CAN add glow stick formula to bubbles easy enough. The problem comes in that even though the bottle of bubbles does glow, the bubbles themselves? Not so much. At all really. First off - that photo? It's a photo of "Miracle Bubbles Glow Fusion" bubbles, which you can buy retail, not of someone DIYing glow in the dark bubbles. How do I know this? the bottle shape. Here's the source of the image above (flickr) 

For this post I decided to buy the glow bubbles shown above instead of DIYing it. I really dislike cutting open glowsticks for a couple of reasons; the smell alone that lingers is awful and being not quite summer, I didn't want that smell lingering in my house from bubbles. They come with two packs of activators - I'm not having a lot of luck with finding what is in these pouches, but I'm going to go ahead and assume it's the same, if not similar formula used in glow sticks. We decided to do this on the last day of spring break, as a sort of kiddie rave party for our kids. We waited until dark and turned out all the lights and pulled the drapes closed to make the house as dark as possible for this, then crank up some electronica music and mixed the bubbles with the activators.


no joke, this isn't just a black square.
I promise it's an actual photo.


Over to the left you can see two photos I took of our party. I'm not joking, the first one is really a photo taken without the flash, the second one with a flash on. So the bubbles don't glow when you blow them. I didn't figured they would, due to surface mass and tension and all that, but when they landed and popped? That was a whole different story. I tried to get a good photo of it, as it looked like the most beautiful milky way space image but I wasn't able to quite capture it with my camera. 
See? Bubbles!


 Which brings up another issue with this: I would HIGHLY recommend using this either outdoors, or in a house with hardwood floors. Everything by the end was covered in glowing solution.  Luckily we had the hindsight to roll up the area rug and do this in our entrance room so it wouldn't get on the sofa in the living room, but the kids still needed a good bath when it was done with.

So all in all, as fun as this is, don't expect to have literally glow in the   dark bubbles. It doesn't matter how dark you get the place (as shown in the photo there to the left) these bubbles just aren't going to GLOW like you want them to. It was still fun though, and something we plan to do again maybe this summer - but outdoors this time, as I don't feel like hosing down the kids and mopping floors so late at night. 


Wednesday, March 27, 2013

Glow Stick Xylophone

"Glow stick xylophone. Put the glow sticks in cups of water and an aura comes off in the dark, when you tap them. Probably the coolest thing ever."


Ah yes, another glow stick pin. Sadly, short of taking illegal drugs, this isn't going to work. It doesn't work that way. 


Kuro! : joo0ey
It's just the effect of long light exposure from her camera, nothing more. Long light exposure is how they get all of those really fun photos you can find everywhere online, like this one on the left. It's done by adjusting settings on your camera. SLRs are recommended but modern day click and point digital cameras can also do this. The real trick is making sure you have a tripod or something completely stable to set your camera on, switch your camera over to manual mode and then messing with the shutter speed of your camera. There's a lot of great how to guides online, but I've found it's best to have fun, go out and do it yourself. I have even written about a great "How to use your camera" blog post on a previous Good Idea Friday, which you can find here.

In fact, if you actually click over to the website where the image comes from, she even states "The aura is just an effect from the camera" So, what does the glow sticks in a cup of water really look like? 

Glow stick water cups : Play At Home Mom LLC

So there you go - still kinda fun and neat, a great play item for the kidos on a rainy evening, but nothing special, no auras, no glowing tubes of light shooting out of the glasses.


Monday, March 25, 2013

Painted Coffee Beans


"Spray paint coffee beans and use them as vase filler...much cheaper than those marbles!" 


Sadly, that's not what this is a photo of. This is an actual product, but it's not designed as a vase filler. They are called Coffee Joulies, and are designed to maintain the perfect temperature of coffee. I know this because I am a total coffee addict, and have been dying to get a set myself  (but sadly I don't own any yet, so I can't report how well they work). They are made from recycled stainless steel and are, in fact, quite a good size - not tiny like real coffee beans. 

Coffee Joulies

But as the pin suggests: can you spray paint regular coffee beans to get a cool metallic vase filler? Eh, maybe. As I've reported before on our lace light bulb post, metallic spray paint never comes out looking like real metal, so if you're after slick metallic stainless steel looking coffee beans, keep looking. Spray paint won't get you that finish. Another issue that I can imagine coming up is what makes coffee so delightful in the first place: oil. Most whole beans will have a wonderful sheen on them from the oils in the bean, making your paint unwilling to stick well to it. Not to mention that it would be quite hard to get beans--tiny little coffee beans--coated evenly enough that they would look nice. All in all, if what you're going for is something like the original image from pinterest, this is just something I don't see working out as you might want it to.


Wednesday, March 13, 2013

Yet Another Sharpie Mug

"Gold sharpie marker, bake at 350 for 30 min and let cool in oven"


Oh yes, the infamous sharpie on glassware posts. Anyone who is a long time follower of such blogs like Pinstrosity will know that really, sharpie + glass + baking does NOT equal long lasting dishware. 

That aside, this isn't what this is an image of. At all. These aren't just mugs that have been colored with a sharpie and baked . They're professional made, and sold at Luna Lighting for £22 a pop. 

But you have a lot of boring old white dishes you snagged cheap at the dollar store and you want to make them a bit fancy, so what do you do?

Toss the sharpie and spend a bit more on ceramic markers. They do the job better, as that's what they are designed for. Most craft and hobby stores carry them. They usually run about $6-$15 a piece depending on brand, but you're more likely to have success using them then you would using a sharpie. 

Monday, March 11, 2013

Stop Signs Aren't Liars

"Good to know!  You don't have to legally stop at all stop signs" 


I just don't even.. Before I even get into how this isn't remotely true, Generally if a stop sign is placed somewhere it's for a good reason - it's there so that people stop and are aware of possible on coming traffic. Private or public roads, it doesn't matter, it's a visual guide to let you know stopping and checking for traffic in that spot is probably a good idea.

But on to why this isn't remotely true. As the pin states, it's more and more common in commercial and residential areas built by developers to place stop signs and other road markers. But this doesn't make them not legally binding. In fact in a lot or areas the developers MUST place proper road signs in areas before the city will even recognize them as streets. On top of that, in the majority of states here in the US, the police DO have jurisdiction on private property - so if you run a stop sign in the mall parking lot, a police officer CAN pull you over for reckless driving. Not only that, but if you run a stop sign and get in an accident, insurance companies couldn't care less if it was a 'real' stop sign or not. You will still be legally at fault for ignoring street signs and markings. In fact there is a great write up on this over at Quick and Dirty Tips about signs posted on private property

But lets also take a look at the image here and think about how they say proves a sign is not a 'real' legal binding sign. It's a sticker on the back of the sign. So in order to know if a sign is real or not, you have to STOP your car, get out, and look at the back of the sign. Also if a mere sticker is all it takes, then the majority of stop signs I've checked out in my city are apparently not legally binding. (or just old or stickerless) What happens if someone decides to pull that sticker off? or fades and washes away with time? 

All in all this is just asinine, not true, and a bad idea. 

Monday, March 04, 2013

Easy Cheese Toast with a side of Fire

"Easy grilled cheese using toaster turned on its side."


I originally heard about this idea over at reddit.com some time back, so I wasn't too surprised when I saw it being repined a year later on pinterest. The problem? The pin doesn't talk about amount of toaster fires this little trick has caused. You can't just take a toaster, turn it on it's side, and expect it to magically make cheese toasties. Not only do you run the risk of the cheese melting down into the elements and catching fire, a lot of toasters have that neat trick of popping the toast up once it's finished. I bet you can imagine what happens when it's laying on it's side and it does that.. yep - it shoots flaming hot cheese toast. Some modern toasters even have a grill that when the level is pushed down, moves in to grab hold of the toast, so if yours does that you're going to have a hard time cleaning melted cheese off the grate. 

So what do you do when time is tight and you have hungry kids demanding food? Best to stick to ether using a traditional toaster oven for this, or do what I do - stick the toast with cheese under you're oven's broiler for a few seconds. It works as well as this trick does and is less likely to cause a house fire (as long as you keep an eye on it - your broiler gets real hot real quick) 

Monday, February 18, 2013

Jello Legos

"Wash mega blocks, fill them with jello, and chill. You will have lego jello!" 


Hey look! It's a picture of Jello, in the shape of Legos! What makes people assume that it's as simple as just filling empty legos with jello I will never understand. I have kids - kids have Legos. I've played with them before and took a look at the underside of the blocks - they don't look like just an inverted Lego.

But the pin says Mega Blocks, which we don't have. A quick google search though shows the same thing on the underside of the blocks. There is no way you can just pour Jello in there and get a lego shape. Not to mention the blocks are so ridged that it would be really difficult to get the Jello out once it's set up. 

So how DO you get Lego shaped Jello shown in the pin? With a silicone mold of course! You can order one here at amazon . Those are made by Lego it appears, but there are several other companies that make them as well. And because Pinterest is all about DIYing, here's a great blog write up on how to make your own silicone mold if you're feeling fancy. 


Crafty Corner : DIY Lego Mold