Showing posts with label crafts. Show all posts

Friday, April 24, 2015

Good Idea Friday - Preventing Buttons From Falling Off

Long story short, I have an AMAZING coat I love that my dear husband hunted down from one of my pinterest pins (take note: pinterest is a great way to find the perfect gift for someone! He's always poking around my pinterest boards for gift ideas). But despite how much I love it, I don't love the fact that the freaking metal buttons are always falling off. They cut the string, any string, that I've used to sew them on. To the point that I need to sew them back on at least once a week.

The coat in question - by a company called Just Add Sugar


So I started looking at ways of fixing this problem. I originally thought maybe buying new buttons, but I like the buttons on the coat. So, dental floss? Ehh.. it's white and might be visible from the dark coat and black buttons.

Then I stumbled across this sewing forum post, and gave the hook and eye method a try. Weeks later, the buttons are still on the coat, even after a long camping trip to the Olympic forest that involved a lot of running around and hiking.

What you need is some hook and eye findings, like these:

You just need the "eye" portion, that on the right
This will only work on buttons with shanks, vs buttons with the typical 2 or 4 holes. Loop the eye portion through the shank (I had to use pliers to undo one end, threaded it through, and reclosed it) then simply sew the eye bit onto the coat, not the button.

Ta-da!

Hopefully this helps out anyone else with the problem of buttons popping off. I know there are other solutions out there (sanding the shank down, using waxed thread or dental floss, etc) but this one is so simple and lasting I had to share.


Friday, June 27, 2014

Good Idea Friday Marble Nail Polish


I had three different people ask me bout this pin this week, so I figured I would go ahead and test it out. We've all see the photos, the good and the bad. And since I've never, ever done this before, I thought it would be a perfect example of what it's like for first timers to give it a go (and why it often ends up a hot mess and failed pin for so many).

I'm here to tell you that, yes, it IS doable. But I'm also going to break it down and explain why, if you're anything like me, this is such a huge pain in the side, that there is no way in hell I would ever, ever do this again. If you're the kind of person who doesn't mind spending an hour on their nails, this is perfect for you. I on the other hand, usually do my nails in the evenings sitting on the couch while browsing pinterest, so needless to say I don't usually do anything overly difficult. 

So here's how the experiment broken down. I originally followed the pin to a T. 


The only thing missing here is the vaseline, which I don't own any, so I reached for my trusted and loved cuticle cream (shameless plug, but I love Orange Thyme products. I own probably a dozen of her lip balms and soaps and seriously, best stuff ever. She's not paying me to say this, I'm just a die hard fan. The Earl Grey lip balm is probably my most prized lip balm ever and I have to hide it so my husband doesn't steal it.)


I added the polish to the water, and noticed right away that the coral polish was creating a strange film on the water. Weird. Well it turns out that the water was slightly too warm, and the polish was a quick-set one, and it was literally hardening in the water. So I had to redo this batch.


And here's the results.


I assumed due to the pin that once it had mostly set up, that I could use something as simple as a toothpick to help separate the polish from my cuticle line, easily cleaning up what is on my fingers. Nope. Didn't work for me. What ended up happening was any sort of pulling, would cause the entire thing to stretch, and tear, making me have to redo everything. So that was a huge fail for me at least.

I then decided to see if using different polishes, different temperature of water, and different shape bowls would have any sort of effect. I tried polishes ranging from $2 Sinful colors, to $12 Julep polishes, and everything in between like OPI, Sally Hansen, Maybelline, Revlon, Zoya. I was curious if the brand mattered. As it turned out, nope! What DID matter was the pigmentation of the polish. Pigmentation can vary from polish to polish, even within the same brand.


I also found that you will get 2, MAYBE 3 good swipes of polish before you need to clear the bowl (I would just use a toothpick and scoot it over to the side) and start over. By the third pass, the polish was less swirly and more clumpy.


After a couple of fails, I found  the combination of polish that worked best for me: OPI in Incognito In Sausalito and Maybelline Color Show in Mint Mist.


After I had all my polish on, I waited. And waited. Once it had set up a bit, I got to cleaning up. Dozens of Q-tips, paper towels, acetone and 30+ minutes later, here are the results. (I also used a very tiny paint brush to better clean up my nail lines and cuticle, something I actually recommend doing after painting your nails anytime for that clean, professional look.)


So there you have it. Yes, it's doable. No, it's not easy. What this experiment showed me, however, was that there were a few things that did help: highly pigmented polish, a shallow plate worked better than a bowl, tepid water worked better than warm, and you should only do 2, maybe 3 swipes before you reset the polish. Also, the clean up is KEY to getting this to look pinterest ready.

Have any of you tried this? Share your photos (the good and the bad!) and what methods worked best for you with us over on Facebook or Twitter. And if you have any pins you're curious, let us know!


Friday, May 02, 2014

Good Idea Friday - Glue and Food Coloring to Make Colored Beach Glass


A fan sent me this and was wondering just how do-able it was. I've seen this around pinterest like many of you I'm sure, but I was pretty skeptical about how well it would work. 

I did a sneak peak awhile back on our facebook page and needless to say, since this is a Good Idea Friday post, it worked! 

I had a small glass candlestick holder I picked up at the dollar store to test this out on. Mixing just your basic kids glue with a drop or two of food coloring (a little bit goes a LONG way! I wanted a more softer realistic color to the glass, so less was more) and I painted it on.


Looking at it, I was still really skeptical. It looked streaked, thicker in some places, and blotchy. 


But checking back on it once it dried.. yep. turned out perfectly! 


Now a few things, this is just basic glue. Water, grease, dirt, even your nails, will damage the coating. In fact you can just peel the glue off or wash it in warm soapy water to get the glue/dye mixture off. But if you're looking for a temporary way of dressing up a table or mantle this would be fine. As far as the source, it looks like it belongs to a private G+ account that had this image shared publicly, so I won't link to that. 

Have any pins you're wondering about? Let us know! Find us on Facebook and Twitter.

Wednesday, April 09, 2014

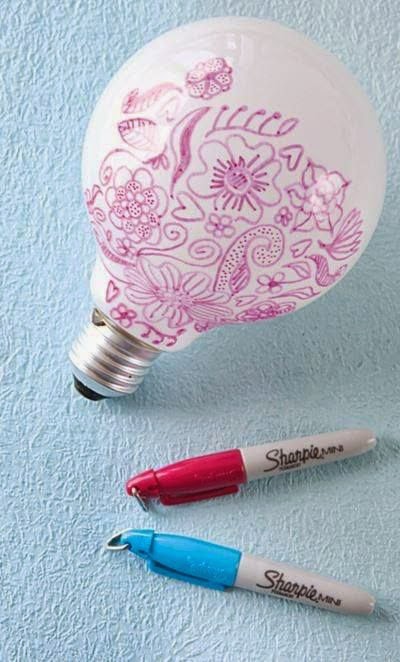
Draw on a Lightbulb with a Sharpie

"draw on a light bulb, and you can have really cute designs shine on your wall at night." 


Yes, another sharpie pin. I've been meaning to test this one out for some time, but most of my light bulbs are CFLs so I've been waiting until I remembered to pick up some old fashion light bulbs. This week was the week. I've been unable to find the original source of the image so I can't tell you for sure if this is what the image is really telling us, or if there is some other craft that has been lost in translation. Often times you find images on pinterest saying one thing, but the source is for something entirely different (like the coffee for hair loss, the brown sugar straightener, the spray painted lightbulb and coffee beans).

Simple enough to test out, I spent about 10 minutes this evening doodling on a light bulb with a Sharpie. 

Here's the finish product:


And here it is, plugged into my table lamp, casting... light. No shapes, no patterns, just bright white light.


 I knew this wasn't going to work, because if you've ever looked at a light bulb, they usually have markings printed on the top of the bulb listing the make, manufacturer and wattage of the bulb. If drawing on them worked well enough to cast shapes, then you'd see the marks from any light bulb being cast on to your ceilings as well. 

Friday, October 11, 2013

Good Idea Friday - Flat Iron Your Clothes

Flat Ironing Clothes : Clementine Bean 


I saw this trick posted on pinterest this week and knew I had to share it. Over at Clementine Bean, she blogged about her trick of using her flat iron for simple ironing fixes. It's something I've personally been doing for ages on my ribbons or scarfs I use on my hair. If you ever find yourself running late and don't want to break out the iron for a simple fix, say your shirt's cuffs are a bit wonky or the hem is curled up, just use your flat iron. Now make sure that the clothing you're using it on is iron safe, of course; don't try this on polyester or anything prone to melting. Otherwise it works great. I'm actually a bit of an odd ball who doesn't mind ironing clothing, but it does seem a bit excessive or labor intensive if all you need to iron is something small. 

In fact, for those of you who sew, I bet having a cheap flat iron dedicated to pressing seams would be an ingenious item to add to your sewing kit. 


Wednesday, August 14, 2013

Homemade Sea or Beach Glass

"Make your own sea glass. All you need is glass in jar with sand and shake. LOVE sea glass."


Ah yes, if only it was that easy. Unfortunately it's not, and I've found a couple of blogs where people have attempted to do this who said it didn't work. Why? Well, first off just sand itself won't even work, you need to add water to it, something this pin doesn't mention. Not only that, the time it would take to do this in a professional tumbler is at least 24 hours. Can you imagine sitting around your house all day long shaking a jar of sand and water to create beach glass? 

There are ways you can make it at home if you love sea glass but don't live near a beach (or don't want to spend hours trying to find it on the beach as it is) but it calls for a rock tumbler. Simply load your tumbler with tumbling grit, water, and broken glass and let it tumble for 24-72 hours. Something you just couldn't do yourself with a jar. I mean, maybe you could reinvent this to be a daily workout, sort of a "Crafters Shake Weight," and shake the jar for an hour each day, and maybe in a month you might have beach glass, but you're best bet if you really want to DIY it is to invest in a tumbler. 

Monday, April 22, 2013

Edible Color Sugar Glitter

"1/4 cup sugar, 1/2 teaspoon of food coloring, baking sheet and 10 mins in oven to make edible glitter...."


Ok, first off, just no. No. That's a photo of glitter. Just plan old glitter. Now, they do make professional sugar glitter for decorating cakes, but can you make it yourself with just plain sugar and food coloring? 

Ehh... sorta. You see, you can make your own colored sugar, it really is quite easy to do. Just follow the instructions above - food coloring, sugar, and bake at a low temp to help dry the sugar so it doesn't clump. But it's not going to look like glitter, it's going to look like colored sugar. In fact if you're interested, over at the blog The Sweet Adventures of Sugarbelle, she does a great write up on how to make your own color sugar for cookies, cakes and sweets, which you can read more here.


But this pin talks about edible GLITTER, which as pretty as colored sugar is, we can all agree doesn't look sparkly. So how can you get that high sparkle look at home? Not with your everyday sugar. You're best bet would be to buy some sparkling white sugar - which is larger crystals of sugar and not as fine, so it refracts light differently from the more finely ground table sugar. You can see a photo of sparkle sugar over there to the left. If you're feeling REALLY crafty you can even make your own, the same way you would make rock candy. Just boil some water and sugar, stir until well dissolved, add a stick to the jar... and then wait... about a week or so, until the water is gone and the sugar crystals have formed to the stick.  You could also, I believe, dye the sparkling sugar, but a quick search hasn't pulled anything up in regards to that. Since I'm not a baker (you know me and oven fires), sadly, I haven't any on hand to test, so I can't report on if it works well or not. 


So all in all, no, you can't make edible glitter at home with table sugar, food coloring and your oven.