Showing posts with label false. Show all posts

Monday, October 12, 2015

Banana Peels to Heal Bruises

"Holding a banana peel over a bruise for 10-30 minutes will remove it's color!" 


Between work, hobbies and wrangler to two kids, I've had my fair share of bruises. So having seen this idea pin several times on pinterest I decided to give it a try. Despite testing it several times, it never once worked for me. Some of the pins suggest doing it right after you get hit, others seem to say it will fade already developed bruises, however if you bang your knee on a table and put a banana peel on it, and a bruise doesn't form - was it the peel or were you just not going to develop a bruise? I tested it both on newly hit areas, and bruises I already had, yet it didn't do a thing for me. (Other than making me looking silly, holding banana peels to my legs) 

Having looked up the contents of the banana peel, I was hoping perhaps there was some high content of some mineral or vitamin known to help the skin, and in turn people assumed it would help with bruises. However despite having vitamins like Manganese and Potassium, it has a much higher fiber and water content compared to an actual banana (source) In that case, why not just use an actual banana? 

Type in "How to get rid of bruises" on pinterest (or even google) will pull up dozens of different methods. I've personally tested out the banana peel method, but I'm going to list below some of the other ways they say you can fade a bruise:


  • Listerine
  • Bananas
  • Vinegar
  • Milk
  • Hand Sanitizer
  • Leeches 
  • Onions
  • Eat Pineapple, Parsley


Unfortunately - most of these will not work. That's not how bruises work. They are caused by bleeding under the skin. About the only one I can see being effective on that list is the leeches, but I don't know of anyone who happens to keep a jar of those handy around anymore. Anything else is just being placed on the surface of the skin, and won't have much of an impact on how fast the blood will fade.

There are some more traditional methods that you can try to help lessen the coloring and pain, such as icing the area and taking an NSAID or tylenol; however as I was researching various methods I came across one that seems to actually work faster than just time : Kinesio tape, also known as KT tape.

The interesting thing about this, is that there are well documented photos showing how well it works. 

from the blog Ride. Write. Repeat.


In fact because of how the tape is applied, you can see where the tape was aiding in the healing process. After searching details on this method, I found countless photos and examples of people with kinesio tape to help heal bruises. The way the tape works on your skin, the tension involved and how it pulls up on the skin; allowing the blood to better disperse. Though it might seem a bit overkill if you're just trying to heal a small bruise on your knee or arm, if you're facing a far more serious and painful bruise, this is the method I'd turn to. Leave the banana peels in the garbage. 


Wednesday, October 07, 2015

Drugs Handed out to Trick or Treaters

"If your kids get these for Halloween candy, they ARE NOT CANDY!!! They are the new shapes of "Ecstasy" and can kill kids through overdoses!!!" 


With the coming of October, there are some things that are just quintessential to Autumn: pumpkins, the changing leaves, and the on going fear of drugs in your child's trick or treat bucket. For decades now the fear has been there. As a child in the 80s the biggest fear was LSD, but today's drug of choice is methylenedioxy-methamphetamine, aka: Ecstasy.

Well rest assured, this isn't going to happen. Not only has there been no record of this happening, but at $10-$20 a pill the likelihood that some strung out raver is going to be dropping these into children's buckets is in fact, very, very slim. Snopes did a great write up about this as well.

But as a parent I will go through my children's Halloween buckets looking for anything out of place, though realistically I'm basically just looking for the candy I myself will end up raiding.

Monday, May 18, 2015

Activated Charcoal to Prevent Hangover

"Simply take 2-4 pills of charcoal after a night of drinking to prevent a hangover!" 


I ordered a bottle of charcoal for another pinterest project to test out, but when looking things up online I found there are actually many different remedies that call for charcoal. One was to use it to prevent hangovers. Sound enough idea, if it's good enough to use in a hospital for absorbing chemicals, surely it'll work on alcohol too right?

So I decided to take one for the team this past Saturday and test it out. One bottle of wine later, I took 3 charcoal pills and went to bed. Come morning, I was hungover. In fact I was SUPER hungover. Far worse than I would normally be after having a bottle of wine.

So what went wrong? Well research actually shows this isn't a good remedy to prevent a hangover. There's a great write up done on this by Mark Rucker, who wrote about the science behind why this doesn't work. The short of it is that charcoal seems to have ZERO affect on the blood level of alcohol in your system, so it won't really prevent a hangover.

The best way to prevent a hangover is still the old standby of not drinking too much, and making sure you are staying hydrated; try having a glass of water for each alcoholic drink you have.

And if you DO find yourself with a hangover, the best remedy in treating it is hydration, and eggs. Not only is the protein in eggs helpful, they contain a large amount of cysteine, which helps break down the hangover causing toxin called acetaldehyde.

Monday, April 20, 2015

Glow Lanterns for Pools with Balloons and Glow Sticks

"Fill a balloon with a glow stick, then inflate! Makes a cool pool lantern!" 


If there is one thing I've learned, it's to be very skeptical of any "glow in the dark" project you find on pinterest. From plant pots to stepping stones, its usually not going to be anything like the image promises.

This is another case of such a project. Fill a balloon with a glowstick, inflate, and have a quick easy beautiful floating lantern, great for late night pool parties and such.

Unfortunately once again that's NOT what this is an image of. Its of an actual product called The Flat Ball Light. At over $200 a pop, that's not quite the easy thrifty item most people are looking for for their home parties.

So what DOES the DIY version look like? Over at the blog Life in the Wylde West, she tested the pin out herself. The results?

Glow Stick Balloons | Life in the Wylde West

Yeah, not impressive. At all. You're better off buying actual LED pool lights (there are cheaper options out there besides the $200 flat lights) but as long as you know what you're getting yourself into, your kids might still get a bit of a kick out the project.


Monday, March 02, 2015

Foot Shape to Reveal Your Heritage


I'm sure we've all seen this one make the rounds all over the internet, from Pinterest to Facebook. But there are so many problems with this I don't even know where to start. 

First off, this really only seems to address European decent. What about Asian, or African, or you know, the various North or South Americas? Second off, the shape of one's feet can vary from family member to family member. Just in our family alone, I have "Egyptian," my husband has "Greek," but our kids? One is apparently Egyptian, the other is Germanic.

The truth is: the shape of your feet can't really tell you what your ethnic roots are any more than saying the shape of your hands can. There has been studies done to see if toe length can show genetic traits, and the ruling is no, the shape of your toes really aren't a good indicator of genes, let alone something like your 'roots' or heritage. Where as genetics and heritage can play a role in certain bone structure, it really isn't a good indicator when it comes to your feet.

Monday, February 02, 2015

How To Get Rid of Telemarketer Calls

"Life Hack to stop telemarketers! don't know if it works, but hey !! its worth a try !! Those pesky pesky people !" 


We've all been there: your phone rings, you pick it up expecting someone important, and instead you hear "How much are you paying for cable each month? Would you like to save $100 on your monthly bill?!"

According to this little life hack all you have to do is press 9 and be instantly added to that company's do not call list! Let's get real, chances are if you're on the line with a live telemarketer, all they are going to hear is an annoying press of a button on their line. They aren't going to know what button you are hitting. If it's a robocall, 9 might work, but so might 2. Each system is set up differently, and some don't even have the option of opting out like this.

The only way to really assure you're removed from the annoying call lists is to make sure you file your number with the national "Do Not Call" list (which you can sign up for here). However that only covers legitimate telemarketers - scammers don't seem to care if your number is on the list or not. So how can you prevent scammers from calling you?

If you know your number is on the Do Not Call list, let the telemarketer know and tell them you wish to be removed from the list. If they call again, ask for the company's name, phone number, and location. If they are scammers this is often all it takes for them to remove you from the list, but that information (if they are willing to give it to you) can be filed here to submit a complaint to the FTC. If it's a robocall, you can try to smash buttons until you get to a menu. Sometimes at the end of the call, there will be an option to "opt out" of their calls. It completely depends on the way their systems are set up though.

However, personally, I just don't answer calls from numbers I don't know. You can also Google phone numbers and find out if it's a scam, telemarketer, collections agency, etc. Another great idea is if a number won't leave you alone, and you're using a cell phone, you can simply add the number to a block list directly on your phone. It won't ring through, and instead send the annoying caller straight to voice mail. 


Wednesday, January 28, 2015

Spoon To Prevent Pots From Boiling Over


I'm sure we've all seen the pin on how a simple wooden kitchen spoon, when placed over a pot, will prevent it from boiling over. Unfortunately it's not true. I made a video demonstrating and explaining why that doesn't work, as well as showing a few methods that do.

So why doesn't this work? Simple. Starch. If you place a pot of water on the stove, crank it up to high and walk away, its not going to boil over. It will boil dry (and possibly ruin your pan) but it won't boil over. What causes pots to boil over is what you're cooking in them, usually high starch foods like pasta. A spoon isn't enough to break the sticky, starchy bubbles that form, and it still allows it to boil over. Images showing this working are likely done by bringing the pot to a lower, more gentle boil, rather than a full, rolling boil, so the chances of the pot actually reaching the point of boiling over are much lower.

So what are the two best methods to prevent this? Use a large stock pot (filling it no more than half way with water) or simply turn the heat down to a medium to medium-high heat. What you're looking for is a gentle boil, just the top of the water moving, not forming large bubbles. It's enough to cook the food, but without forming starchy bubbles. Another method involves a kitchen gadget such as a silcone lid, which allows the foamy mess to collect on top with out pouring all over your cook-top. I personally love mine, but it's not a necessary to prevent pasta from boiling over.

Monday, January 26, 2015

Hydrogen Peroxide to Diagnose and Cure Ear Infections

"Amazing Ear Infection remedy. You'll know if there is an infection and treat it at the SAME TIME. Pinning and reading later need to check this out." 


I'm laid up on the sofa today with vertigo from an ear ache, so in the name of science I turned to pinterest to research home remedies (of course, by "science" I actually mean ridiculous home remedies I can test and research).

So, does putting a simple solution of hydrogen peroxide in your ear let you know if you have an infection, as well as treat said infection? NOPE. 

You see, hydrogen peroxide is just simply water with an extra oxygen molecule to it - H202. Now that's not to say it's the same as water, simply altering or adding various single molecules to things can change them drastically. But that's not the case with things like hydrogen peroxide. 

But why does it bubble when you add it to a cut? Because of a simple thing called catalase. Pretty much everything from fruits and veggies to human tissue contains this enzyme. When exposed to the peroxide, it causes the H202 to break up, and allows the extra oxygen molecule to free itself, causing the bubbles. Ta-DA! Even if you're ears are clean and free of infection, chances are good the peroxide will still bubble and foam, so that's really not a good way to test for an infection. Want to test this out? Pour a small amount in a glass and use it as a mouthwash, and enjoy as your mouth fills with bubbles! Just be careful not to choke or gag!

But how about the second claim? Will it at least treat an infection if you have one? Maybe, but it's not likely. Results are mixed as to if this works or not.  It's important to realize that there are various causes for ear infections, from viruses like those that cause colds, to allergies, not to mention bacterial infections which require antibiotics (peroxide is NOT recommended for killing bacteria, as it doesn't kill everything and can actually cause scar tissue to form, something you don't want in your ears). What it is quite good for though, is helping with ear wax removal - in fact ear wax drops are typically nothing more than mineral oil and peroxide. So all-in-all, you can put peroxide in your ears, but it's not going to let you know if you have an infection, and it's most likely not going to cure anything. It's not uncommon for a lot of earaches to only last a few days on their own, so if you find relief using this trick (or warmed oil, which is also a common ear ache treatment) then go for it. However if your ears aren't better after a few days then it's time to seek professional help. 

Wednesday, June 18, 2014

Fire Glass - Amazing Flammable Glass to Replace Wood

"Fire glass produces more heat than real wood, and is also environmentally friendly. There is no smoke, it's odorless and doesn't produce ash. You are able to stay toasty warm without cutting down trees and the specially formulated glass crystals give off no toxic deposit.."  


I actually stumbled across this on a buzzfeed article about pinterest (I will just come out and say it, if you want bad pinterest ideas, buzzfeed is a hotbed of them) and knew right away that couldn't be right. I searched pinterest curious to see how often this is actually pinned, and was floored that the above image has been repinned nearly 5,000 times from one pin alone.

A quick Google search later and sure enough, I found the website for Fire Glass. Pulled directly from their FAQs: 
"Fire Glass is tempered glass that is used in fireplaces and fire pits to increase vibrancy, reflection and color. Tempered glass is tumbled and polished to prevent sharp edges and injury. The glass is designed for gas fire pits and gas fireplaces to tolerate high temperatures without melting, burning or discoloring when used as recommended. The glass does NOT create toxic fumes, smoke, ash, or soot... You can use fire glass with both propane and natural gas. "

What does all that mean? It's not a "flammable glass". It's a filler used in gas or propane fireplaces and fire pits; instead of lava rocks or fake wood, you add Fire Glass. The glass itself isn't flammable and won't do anything if you try to set it on fire. It's not a replacement for real wood in a wood burning fire pit. It is quite pretty and I can see the appeal, but unless you have a gas burning pit, it's not going to do anything.

Monday, June 16, 2014

Iodine and Baby Oil Hair Remover

"1Tbsp of iodine 2% 1 Cup of baby oil Rub your hairy area with the mixture and let set for only 5 minutes. Then gently wipe away with a damp cloth. Viola!!!! NO MORE HAIR!"


I've had a lot of people asking about this one. My first step was try to locate the source of this image. I was unable to find the source though so if anyone knows, please let me know. But right off the bat, the leg shape, muscle tone, as well as the hair growth made me believe this was a man's leg. Not that men can't and don't remove leg hair, but if you look closely you'll also notice a rather large scar running down the knee of the hairless leg.  We often see similar ideas where an image of one thing is used to promote a completely different idea, like the spray paint light bulbs, brown sugar for hair straightening, coffee for hair remover, and the fake tan from cocoa powder, just to name a few of the ones this blog alone has disproven. 

Which leads me into why I don't believe this is even remotely plausible as a pin. You see, it's common for surgeons to scrub an area before surgery with iodine. If iodine was such a remarkable hair remover, why would they bother doing pre-op shaving? Anyone who has had surgery on an area with hair growth can tell you that the area is shaved before hand. Wouldn't doctors, of all people, look for time-saving methods and skip the shaving if iodine could double as an antiseptic AND hair remover? 

Not only that, but a lot of results when you google iodine and mineral oil pulls up people talking about how back in the days of bottle brown tans, this was one of the go to tanning methods. If it worked as a hair remover, I think it would be more commonly known today, and I also doubt a lot of men back in the day would have used it as often as they did. Anyone who has used iodine can attest to how it stains the skin, however the hairless leg seems oddly void of any kind of staining. 

And finally, chemically, there is NOTHING in these two that would cause such a reaction as hair loss. 

But in the name of science, and because I know you love proof, I tested this pin out just for the blog. Since it's summer though, my legs get shaved regularly, so I brought in a stand in for this pin. Meet the other half of "us" here at Don't Pin That, and my editor in chief, Tay.


Tay, bless him, is hairy. Very much like the original image. So who better to test this pin out? 


Tay was a good sport spending his father's day evening letting me test this out. I mixed up the mixture and then tucked a towel under his leg incase it dribbled onto the sofa, and applied it.


Then we waited. The pin says 5 minutes, but since there was a bottle of wine and an episode of Conan to catch up on, it turned out to be more like 15 for us. Gently rubbing it away didn't do much, so I then scrubbed. The hair however, remained firmly attached to his leg: 


His very yellow stained leg I might add. 

So there you have it. No, this doesn't work. There's no way this would work chemically or even logically. I have no idea what the source of the original image is, but it's not from some miracle iodine hair remover. 

Have an idea you want us to look into? Contact us! We're on facebook and twitter - leave a message, an pin, or just say hello. 


Wednesday, April 30, 2014

Egg White Pore Strips


"DIY pore strip/mask with egg white and toilet paper! So trying this!"


This is part 2 of the DIY pore strips that I've been testing out. The first one didn't even set up right, but what about this one? First off - the link connected to this image, at least for me, was a spam site. Which isn't really adding to the credibility of this. Now the idea of eggs as a facial isn't new, and egg white masks have been popular for many, many years, but can you use them as a DIY pore strip? 


Well I tested this one out this weekend and it failed miserably. I don't know if it was the paper I was trying, but it became a soft gooey mess on my nose. I had to attempt this one a few times, because the toilet paper kept falling apart. I first tried to dip it into the egg whites, but it mushed up in the bowl, so I then smeared some of the egg whites on my nose, placed the paper on, and pat on more egg whites with a q-tip. However that caused it to goo up again and tear. So round three, I put egg whites on my nose and tried gently patting the toilet paper on. It didn't work all that well, but it did stay, and at that point I figured it was good enough. 


Facebook and Twitter fans got a sneak peak of this lovely image
I waited until it was hard and set up and peeled it off. I looked over what I peeled off my face but didn't see a single thing. It's hard to say if it was due to the texture/pattern inherent in toilet paper, but even on zoom I couldn't see a thing. 


Now here's where I add the disclaimer that I'm a skin care freak, in the same way some women are crazy about shoes, or makeup, or books, I'm that way about skin care. So my pores are generally kept clean and clear more so than the average person. But even the best skin has clogged pores and blackheads, so I went ahead and tried a Biore strip to compare what it pulled out vs the egg white/TP mix. This time around it was clear the strip pulled some gunk out of my pores. (if you look closely by my fingers in the photo below, you can see a few blackheads)


Ewww! 
So there you have it.  If you ask me, it doesn't work at all. Just testing out the two methods side-by-side, the feeling of pulling the biore strip off hurt more than the egg white one. Which sounds weird to say, but the hold, the adhesive of the biore one was clearly stronger than the egg whites were, so it seemed more likely to get the junk out of your pores better. 

I'll be testing out a few other methods in the coming weeks, so if you have any DIY pore strips you're curious about post the ideas over on our facebook or twitter!

Monday, April 28, 2014

Freeze Envelopes to Open

"If you seal an envelope and realize you forgot to include something inside, place it inside the freezer for an hour or two & it'll unseal easily."


Before anyone asks, yes I tested this out. On several different envelopes, in fact. I know there are different kinds that feature different glue, some you have to lick, some are self stick, some use thicker paper. Needless to say it didn't work at all. I'm not surprised, if it worked wouldn't we all run the risk of our mail popping open during the winter months? I tried this with newly sealed envelopes as well as various ones sent to me, and they all tore like regular unfrozen envelopes when I tried to ease them open. It seems most sites that recommend this haven't even tested it, and the one youtube video I found had the guy opening it, but he only sealed the most bottom tip of the envelope, which would be fairly easy to open gently without even freezing it. 

Honestly if you DO forget to add something to an envelope, and you've already added the stamp (and don't want to waste that by having to put everything into a new envelope) the easiest thing to do is to use a sharp knife, open it from the bottom carely, add what you need to add, then seal back up with tape. Not ideal, but it works far better than trying to pry open the seal. 

Wednesday, April 09, 2014

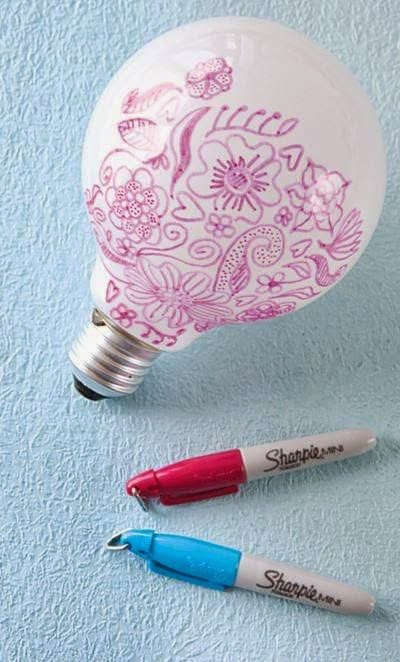
Draw on a Lightbulb with a Sharpie

"draw on a light bulb, and you can have really cute designs shine on your wall at night." 


Yes, another sharpie pin. I've been meaning to test this one out for some time, but most of my light bulbs are CFLs so I've been waiting until I remembered to pick up some old fashion light bulbs. This week was the week. I've been unable to find the original source of the image so I can't tell you for sure if this is what the image is really telling us, or if there is some other craft that has been lost in translation. Often times you find images on pinterest saying one thing, but the source is for something entirely different (like the coffee for hair loss, the brown sugar straightener, the spray painted lightbulb and coffee beans).

Simple enough to test out, I spent about 10 minutes this evening doodling on a light bulb with a Sharpie. 

Here's the finish product:


And here it is, plugged into my table lamp, casting... light. No shapes, no patterns, just bright white light.


 I knew this wasn't going to work, because if you've ever looked at a light bulb, they usually have markings printed on the top of the bulb listing the make, manufacturer and wattage of the bulb. If drawing on them worked well enough to cast shapes, then you'd see the marks from any light bulb being cast on to your ceilings as well. 

Wednesday, March 19, 2014

Freezing Candles to Prolong Burning and Preventing Drips

"freezing candles not only makes them burn slower, but can prevent them from dripping" 


This was a really interesting pin to test out. My original theory on this was honestly it wasn't going to make  difference, assuming that any temperature change freezing the candle would have made would quickly fade once it was brought out into a room of steady 70* temperature and lit. In fact, googling brought up a handful of sites that also agreed with this theory.  

As soon as I saw this pin I went to my drawer of candles and was ready to test it out. Yes, I really do have an entire dresser drawer dedicated to candles. Despite what you might read on pinterest, crayons and Crisco are no replacement for good candles. Unfortunately when going through my stash, I realized I mostly have hundreds of tea lights, larger scented decorative candles, and only two matching unscented plain wax votive candles. I wanted uniformity, candles of the same brand, same size, and unscented, with out coloring to assure nothing would get in the way of results. I would have liked to have had at least a half dozen to assure clear results, but I decided to test this out regardless.


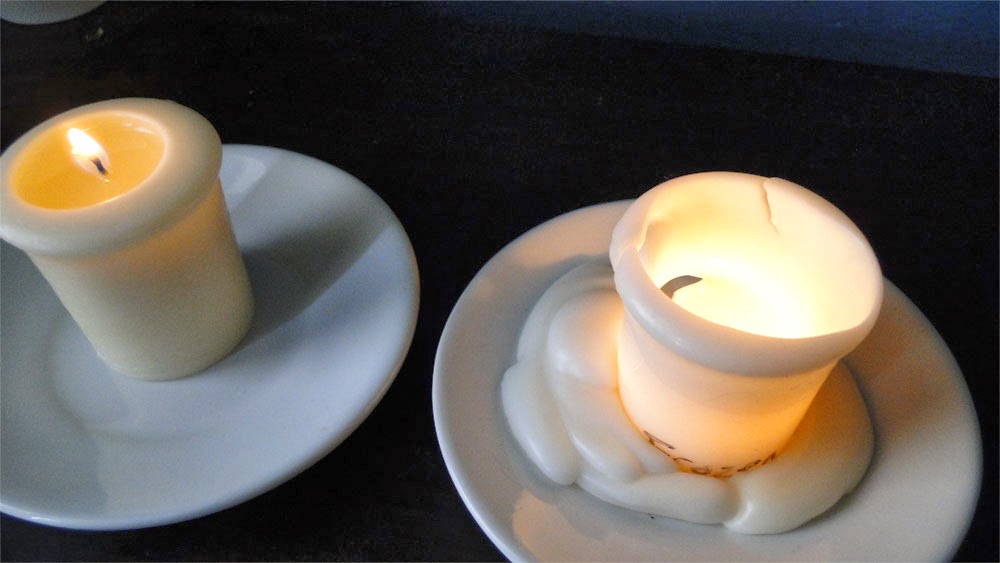
One candle was left in the drawer at room temperature, while the other one was left in the freezer for a week. I pulled out the candle and wrote "Frozen" on it, to assure the candles wouldn't get mixed up, and then placed them both on the same style of dish on my china hutch. They both lit just fine and I decided to check back in 30 minutes to see how they were doing. 


(Room temperature on the left, frozen on the right) 


I was amazed to see after the first 30 minute mark that the frozen candle appeared to be burning slower - the ring of melted wax was much smaller than it was on the room temperature candle. This was actually starting to look promising! 

However, when I checked back again in another 30 minutes, the tides had changed. The frozen candle still had a smaller area of melted wax, but had clearly burnt down faster than the room temperature candle. I kept checking back every 30 minutes, and it became clear that the frozen candle was actually burning faster then the room temperature one was, by quite a lot. 
You can see here the candles, side by side, after just about 2 hours of burning.


So I'm going to say this is a bad idea, most other articles on this I've read have said that it doesn't do anything as far as extending the life of the candles and how fast they burn, and if my test is a sign of anything, it actually makes them burn far faster. Honestly though I WILL be testing this out again with a larger amount of candles, the sheer difference in burning just the two candles makes me think this can't be a fluke. And drips? Yeah that's a no. The frozen candle ended up spewing and dripping wax so badly that I'm glad I had set it on a dish before lighting it. The room temperature candle didn't drip and didn't leak at all, though it also didn't burn down as far a the frozen candle did.

Wednesday, March 05, 2014

Color Code on Tubes Warns of Danger


"Good to know! Learn how to read the markings on all tubes so you can check what you are using before you use it." 


Imagine if at a glance, you could see how natural that toothpaste you're about to use really is? According to this image and others like it, it's as simple as that. On the tops of most tubes you will find an colored square, usually of only a handful of colors: red, blue, green, and black. Are these really secret markers allowing you to tell just how natural that cream or toothpaste is? 

Nope, not at all. If anyone has seen shows like "How It's Made", you probably already can guess the answer. Those "color code" makers are actually just color markers to let the sensors know where to cut and crimp the tubes in manufacturing, nothing more. In fact it's already been busted by snopes. And as they say, if you really want to know what's in the produce you're using, reading the ingredients label might be a tad more helpful. 

Monday, February 03, 2014

Coconut Oil As Sunscreen

"Coconut oil is the original suntan/sunscreen lotion ... Coconut oil is a proven sunscreen that is still used by millions of people in the tropics as their sole source of protection from sunburn and skin cancer." 


I'll be the first admit that coconut oil IS nice, but unfortunately it gets more hype than is really needed. It's the new go-to oil of the millennium (older people will remember when olive oil was the go-to oil in the 80's and 90's). It's been the cure-all for everything from weight loss to eczema. But can coconut oil work as a perfectly natural non-toxic sunscreen? 

Ehhh, sort of. It depends entirely on the amount of SPF you're after. Will coating yourself with coconut oil prevent sunburn? To a degree: yes. It has a natural SPF of about 7. Yep, 7. Technically it's 7.11, which is actually lower than olive oil at 7.549, but higher than most all other oils. (source) 

SPF 7, however, is really, really low, and will not protect you all that much. Not only that, but you will need to reapply it constantly since it doesn't offer the staying power that commercial sunblock does. Even if you don't burn, you're still exposing your skin to dangerous rays. There's a lot of misinformation about SPF, I've heard everything from the "SPF tells you how long it lasts" (not true) to "all sunblock is the same" (also not true). The recommended SPF for most people is 30, and you should make sure that the sunscreen you're using not only blocks UVA but also UVB. (source) 

Another thing to take in account that this pin does not, is that everyone has different skin types. Coconut oil might work as a sunscreen for those native to the tropics, but that doesn't mean it's going to work as well if you're genetically low on melanin, like those who are from northern countries. Depending on the melanin levels in your skin, just trying this once could result in a nasty sunburn.

I get that a lot of people are trying to get away from chemicals and possibly harmful products, but at the end of the day, skin cancer caused by exposure to UVA/B rays is also a risk you have to consider when you're debating on which cream to reach for this summer.

Monday, October 28, 2013

Glow In The Dark Planters

"Buy a flower pot that you really like and use Rustoleum's Glow-in-the-dark paint to paint the pot. During the day, the paint will absorb the sunlight and at night the pots will glow." 


I'm completely convinced  that people who pin and share these things on Facebook have never actually tried glow-in-the-dark paint. The first thing wrong about this image is that well, it's not night. At all. The second is the amazing glow the pots are putting off, enough to even illuminate the grass. Glow-in-the-dark paint won't do that. 

You see these aren't just painted pots, they are LED-lighted pots. I've been trying to track down the direct source of  this image, but haven't been able to. However I have found enough variously similar planters to show you, like these from Konstsmide, a German light manufacture:


And just like in other various "Glow-in-the-Dark" pins, people don't seem to take in account that glow in the dark paint is very green/yellow. In fact there is a great review and write up about two different popular glow-in-the-dark paints at Observation Blog. Here is his 2 examples of the paints, which even with 8 hours of charge were barely glowing, surely nothing strong enough to light up the grass around it. 

So once again, put down the paint, people. Sadly this isn't even near what the original image is. And please let me know if anyone knows the source of the original image! I'd love to email the photographer or landscapers who did this and give due credit. 


Monday, October 14, 2013

I Fear The Day.. By Einstein (Meaningful Misquotes #3)


I'm sure we've all seen this one. Its usually pinned or shared on facebook, sometimes with an image of young teens bent over their phones, not talking with each other unless it's through text messages. People who pin it will often comment things like "SO TRUE!" 

The problem is of course, there is no record of him saying this. Einstein has to be one of the most misquoted historian figures of all times (along with such people as Plato). The quote unfortunately can not be traced back to him, and is not found in The Ultimate Quotable Einstein by Alice Calaprice, who is a renowned Einstein expert. 

A bit of research also pulled up this collection of tweets from Waldo Jaquith where he was able to track down the original source of the quote, and it appears to have originated from a downloadable (and questionable) app for your phone. The app in no way sites it sources for the quote, so I'd be pretty skeptical about ANY quotes from this app. 

Wednesday, October 09, 2013

Mother Spoon - Electronic Sensor Spoon Shares Your Recipe

"Basically what happens is that you and your mom buy your own pair of Motherspoon and register onto a dedicated platform for file sharing. So when you mom cooks her recipe and uses the spoon to taste her food, the sensor laden spoon picks up the ingredients and deciphers the recipe. When put on its cradle, the spoon loads the recipe to the sharing platform so that you can access it, even if you live miles apart."


I was honestly surprised by how many times I've seen this pinned, with people wondering where to buy it. Because you can't, as it's just a concept design. In fact as aesthetically pleasing as the spoon is, I'd venture a guess that unless something happen technology wise, this will always just remain a concept. We just don't have sensor technology today that would even come close to doing what this spoon is reported to do, and even if we did the cost alone would make it out of the reach of most people. 

You can read more about the spoons over at Yanko Designs, which just for the record, is a site mostly of unmade concept designs. So if you come across a pin that came from Yanko, chances are it's not a real item. 

Monday, October 07, 2013

(Yet Another) Mountain Dew Glow Stick Hoax

"How to make a homemade glow stick - baking soda, mountain dew, peroxide, starbursts, and dish soap"


This takes the original hoax of making Mountain Dew glow and adds even more pointless items. I honestly started laughing when they added two Starbursts, as if somehow a mixture of gelatin, HFCS, and red dye is going to aid in this. In case you're curious, you can see the video here: 


Just like in our last post about the ever popular Mountain Dew Glow Stick, the basic idea is you add certain things to the Mountain Dew (notice how both video has the use of peroxide in them? We'll come back to that in a bit.) and after a bit of shaking, it glows, just like a glow stick. Why? Well what they don't show you is the contents in the bottle; in both videos the bottle already contain some liquid, which is generally believed to be Mountain Dew. In all likelihood however, it's probably a nice mixture of glow stick chemicals. Once the peroxide is added (which is also used in glow sticks, that is what is in the glass vial you break to activate them) it starts to glow. You can read a step by step guide in making your own glow sticks over at Wikihow (with actually glow stick chemicals), which again, uses peroxide.