Showing posts with label DIY. Show all posts

Wednesday, April 22, 2015

DIY Sugar Wax Hair Remover

"Finally a Working Homemade Hair Removal Solution!" 


This is one of those ideas I debated on blogging about, but after asking fans over on our facebook page if they wanted more "it works but it's...ehhhh" posts, I decided to go ahead and share.

Sugar Wax. A long-time touted hair remover, and something you can easily make in your own kitchen. With a few simple ingredients you can be on your way to being hairless for a fraction of the cost of waxing kits you buy in the store. Right?

It's not that simple. I decided to test this out myself after reading a lot of mixed reviews on it. I found this YouTube video and decided to spend an evening testing it out.


The first batch didn't turn out. Neither did the second. Or the third. I told myself one more try, and then I was going to give up. Well wouldn't you know it, fourth time's a charm I guess, because this time to turned out like the video suggested it would.

So how well does it wax? Not as harshly as the store bought wax I normally use. Which was nice. I tested it out on my eyebrows, upper lip, and arm. It wasn't as easy to control, so my brows didn't turn out as cleanly as I like them, but the upper lip was nice (and it didn't make me break out, which most waxing does when I do my upper lip) I did have to apply and remove it many, many times to get most of the hair, unlike the one time application I do with other waxes. I have dark thick body hair though, so my fair haired followers might not have to apply it as much as I did.

I wrapped the leftovers in plastic wrap, and then went back a bit later to try it again. Unfortunately, it stuck something awful to the bag, and despite briefly microwaving it and trying to warm it with hot water, I could not get it off the plastic wrap. What I did manage to pull had changed in texture and consistency and was pretty much useless.

Personally, I'm sticking to commercial waxes (this is the one I normally use). At the end of the day, this was such a hassle, a mess, and countless hours in frustration that I just can't get into it. Does it work? If you can manage to get it the right consistency, yeah. But is it worth all the hassle? For me, the answer is no.

So has any of our fans tried this before? What were your results like?

Monday, April 20, 2015

Glow Lanterns for Pools with Balloons and Glow Sticks

"Fill a balloon with a glow stick, then inflate! Makes a cool pool lantern!" 


If there is one thing I've learned, it's to be very skeptical of any "glow in the dark" project you find on pinterest. From plant pots to stepping stones, its usually not going to be anything like the image promises.

This is another case of such a project. Fill a balloon with a glowstick, inflate, and have a quick easy beautiful floating lantern, great for late night pool parties and such.

Unfortunately once again that's NOT what this is an image of. Its of an actual product called The Flat Ball Light. At over $200 a pop, that's not quite the easy thrifty item most people are looking for for their home parties.

So what DOES the DIY version look like? Over at the blog Life in the Wylde West, she tested the pin out herself. The results?

Glow Stick Balloons | Life in the Wylde West

Yeah, not impressive. At all. You're better off buying actual LED pool lights (there are cheaper options out there besides the $200 flat lights) but as long as you know what you're getting yourself into, your kids might still get a bit of a kick out the project.


Friday, March 13, 2015

Good Idea Friday - Plywood Floors


We've spent the past year overhauling our attic into a bedroom. Our house, built in 1909, has amazing hardwood floors in most rooms and we were trying to figure out how we could install new flooring--on a budget--that wouldn't clash too terribly with the original flooring. After spending countless searches on pinterest trying to come up with a solution within our budget, I came across this blog post from the infamous Centsational Girl about plywood floors.

Now, I was skeptical. Really skeptical. But after crunching the numbers we realized with $80 worth of plywood, we could install flooring not just in the new bedroom, but also in the hallway leading out to the upstairs landing, So we decided to give it a try. If it didn't work out we weren't out that much money, and hey, nothing a couple area rugs couldn't cover right?

We went about it slightly different that the above post, we had the hardware store cut the wood for us, in the same width as our hardwood floors, and in various lengths. Stores generally charge for this, but for us this was still better than trying to use our extremely old and fairly scary table saw.

First to go down was the sub floor chipboard, screwed to the floor joists, then plastic foam sheeting designed to go under flooring. We laid out the planks, lined them up to our liking, and nailed them down using a brad nailer. Once in position, we used dark caulk to fill in any gaps. This is a great trick, by the way, for hard wood floors; plaster, putty, and glue-sawdust mixture tends to dry and can crack apart and/or pop out over time. Silicone caulk on the other hand, does not. You can find it in various different colors too, so get one that matches the stain you plan to use. (I got the idea from a great friend who also blogs about home remodeling and projects - Us Versus The House

After the caulk set we sanded, gently. Plywood is thin sheets of wood glued together, sand too hard or deeply and it gets funky looking, as some colored inner layers will start to show. Just be careful when sanding. We then applied 3 coats of a dark brown stain (Jacobean by Minwax), the same we used on the original floors, and then finished the whole floors with 3 coats of water based polyurethane.

And the final product! 


There's a few things we would have done differently with our flooring though: don't skimp on the wood. We went with a thinner (cheaper) 1/4" plywood, where as the original blog post suggests 1/2", and though it was fine for the room it's in, in a much higher traffic area we would really recommend going with thicker plywood. It LOOKS great, and nearly matches the original wood floors for us, but the sound is off. I know that sounds silly, but it actually sounds more like a laminate flooring instead of actual wood.

All in all I'm extremely pleased with the floors, and for the price (roughly $160 for all the supplies), you really couldn't get a cheaper flooring option than this. This might SOUND like a large undertaking, and something out of the reach of most people, but it really was one of the easiest projects I've done. To summarize, you basically get plywood, cut into planks, lay down subfloor and subfloor sheets, nail planks down. sand, stain, poly. Done. Something like this could easily be done in a week or less (have to let that stain and polyurethane dry!) and is a great floor option for anyone looking for something new on a tight budget. 

Oh, and because I just can't NOT post before and after photos of the attic turned bedroom, here you go if your curious. It was originally lined with wood planks and covered with newspaper from 1918. We KNOW wood plank rooms are en vogue on pinterest, but if you saw the amount of dust and heaven knows what else that fell along with the planks.. you wouldn't want that in your bedroom. Ever.


Before Remodel


After Remodel


Wednesday, April 09, 2014

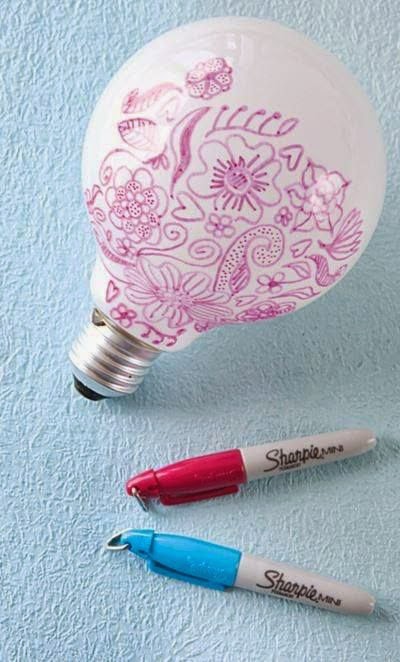
Draw on a Lightbulb with a Sharpie

"draw on a light bulb, and you can have really cute designs shine on your wall at night." 


Yes, another sharpie pin. I've been meaning to test this one out for some time, but most of my light bulbs are CFLs so I've been waiting until I remembered to pick up some old fashion light bulbs. This week was the week. I've been unable to find the original source of the image so I can't tell you for sure if this is what the image is really telling us, or if there is some other craft that has been lost in translation. Often times you find images on pinterest saying one thing, but the source is for something entirely different (like the coffee for hair loss, the brown sugar straightener, the spray painted lightbulb and coffee beans).

Simple enough to test out, I spent about 10 minutes this evening doodling on a light bulb with a Sharpie. 

Here's the finish product:


And here it is, plugged into my table lamp, casting... light. No shapes, no patterns, just bright white light.


 I knew this wasn't going to work, because if you've ever looked at a light bulb, they usually have markings printed on the top of the bulb listing the make, manufacturer and wattage of the bulb. If drawing on them worked well enough to cast shapes, then you'd see the marks from any light bulb being cast on to your ceilings as well. 

Friday, September 20, 2013

Crisco Candle Does Work, But Still Not the Best Idea


Ah, yes, the Crisco candle. I've had a lot of people send me this asking about it. Does it work? Yes, it does. It's also easy enough to make: just take a tub of crisco, use a stick or skewer to pierce a hole through the center, and insert a wick. I know, I usually do Good Idea Fridays, but this one is a mixed-results post; since it does work, I didn't feel it qualified as a bad idea, but there are some risks involved that I think everyone should be aware of. 

First off, the container the shortening comes in? It's a foil-lined cardboard tube. So, where as this can burn for something like 45 hours, as the pin suggests, I would never in a million years suggest doing that. If left to burn long enough, the melted oil of the crisco can make it's way into the paper, making it perfect fuel for fire. Also, as with all things like this, Crisco CAN catch fire (so can wax and other oils that are used in candles and oil lamps). Please, if you try this, DO NOT let it burn for too long. It's not something you just light and walk away from. 

The truth is, this is something I would only ever use in a last case scenario. There are much better options out there that would work better, but if you find yourself in a cabin in the woods in the middle of the night with no electricity and the batteries in your flashlight are about to go out, then something like this will work. But for everyday home use when the power goes out, anything from candles to a battery powered lantern would still be preferable. The truth is, with a bit of wick and pretty much any oils, you can make a candle or lantern out of anything from kerosene to tallow to paraffin or lard. But they all come with a high flammable risk, so be careful.

Wednesday, July 31, 2013

Epsom Salt to Remove Tree Stumps

"Tree Stump Removal - Get rid of tree stumps by drilling holes in the stump and filling them with 100% Epsom salt. Follow with water, and wait. Live stumps may take as long as a month to decay, and start to decompose all by themselves."


A fan sent me this and I was rather curious since I've done a Good Idea Friday in the past on how plants love epsom salt. It took me a bit but I found the source of the image. Guess what? It's for a chemical powder you add to stumps, not epsom salts. But would epsom salts work? 

I found quite a lot of websites that mention this method, but one thing stood out to me - a lot of them said ether rock salt or epsom salt. But as I address in the previous epsom salt post, epsom salt isn't like table/ rock salt. They have different chemical compositions, "salt" is a quite broad scientific term. I have no doubt that perhaps rock salt would work, but the minerals that make up epsom salt I don't see working as well. 

I walked along my lawn trying to find maybe an old stump I didn't know was there, but alas I had none to test this out on. I looked online assuming since it seems like such a popular idea that there would be people who have attempted this as well, but could only find one blog post that talked about actually using this method. Over at Lisa Earthgirl, she writes about trying this out. I asked how it was coming along but unfortunately due to a damp summer, she's going to have to try it again to see if it shows any results. Most other search results ether pulled up questionable commercial sites, or seemed to be along the lines of  "a friend of a friend tried this with success" 

So I'm not calling this a Bad Idea yet, but unproven to date. Personally I think you'd have far more success with something like rock salt which is known to kill plants. If you've tried this with conclusive results, please let us know! 


Monday, July 01, 2013

Landry Basket to Make Polka Dot Walls


"polka dot walls! Make a stencil from an old laundry basket" 


Today's post is what I wouldn't call a bad idea, but that's just not what this is an image of. I too was tricked by this post as first, it's been making the rounds of pinterest for sometime now. But I got to thinking ... laundry baskets are made of fairly thick plastic, which would make for a pretty bad stencil. Anyone who has ever worked with stencils knows that the thinner the plastic, the better. It helps keep the stencil flush with the wall and prevents paint from dripping or leaving the boundaries of the stencil. A quick search later and I realized why that didn't seem right with me: it's not a stencil made from an old laundry basket at all. 

Over at The Lil House That Could, you'll find the original source of the image. It's not a laundry basket, just a traditionally made stencil. 

Polka Dot Closet : The Lil House That Could 

I'm all for turning everyday items into something else (the cut bottoms of celery make the prettiest rose pattern for stampings!) but when it comes to stencil work, thinner is better, so I'd set the laundry basket down and just use a traditional stencil.  


Wednesday, June 26, 2013

Shattered Mirror Floor

"Broken glass floor - great for a bathroom floor or countertop. Just lay broken mirrors on the floor and top with polyurethane" 


I don't even know where to start with this one. That's not what this is an image of. The image quality makes me believe it came from a magazine of sorts, but I'm having a hard time finding the source. My first thought when seeing this image is that it was an artsy spread of some sort in a magazine, not some great DIY home design project.

I'd like to point out there is no sealant or polyurethane in that photo, it's just broken mirrors. Also, as someone who has done a lot of refinishing including the floors of my house, polyurethane is an extremely thin sealant - I think what the creator was the pin was thinking more of would be an epoxy resin, which on the floors wouldn't work easily, takes days to set up, and bubbles like crazy unless it's set just so or with a heat source. 

So yeah, this isn't even doable if you ask me, at least not as a DIY home project. 

Friday, June 21, 2013

Good Idea Friday - Coloring Your Dresser Pulls

"Color plain dresser pulls with a sharpie and bake!" 

Faux Malachite Knobs : Tea and Lime


When I first saw these I thought for sure it was the good old switch-a-roo, like the spray painted light bulbs I wrote about. These don't look like sharpie covered knobs to me, instead they look like something you could get at Anthropologie for $22 a pop. So I was honestly surprised when I found the blog post about how to make them!

Over at Teal and Lime, Jackie wrote about how she wasn't happy with the pulls that came with a dresser she had bought. So she broke out a sharpie and started coloring them. After letting them dry she baked them at 350° for 30 minutes. They certainly are beautiful, but I was worried that with being knobs, the wear and tear would soon have the ink coming off. I sent her an email and asked how they were holding up. She replied that they were still holding up fairly well, a bit of the color was coming off but that it wasn't enough to bother her yet, plus touch ups won't be hard. Readers of her blog have suggested you could even do a quick lacquer coat with professional spray or even clear nail polish, which is something I would highly recommend if these are going to be used regularly. Another idea would be to use a ceramic marker (which was her original idea until she learned her marker had dried up). But all in all, I think this is a great idea for adding a pop of color to your home without spending a fortune on new pulls.

Friday, May 24, 2013

Good Idea Friday - Clean Your Dishwasher!

DIY dishwasher repair : The Quick and The Hungry

This is a pin that hits close to home for me. We renovated our kitchen just 2 years ago, and got a new dishwasher. It worked great the first 6 months, and after that it slowly but surely was giving up. Nothing we tried seemed to work, and I was sure my dishwasher had kicked it. I started having to hand washing my dishes and referred to the dishwasher as a $500 drying rack, because that was all it was good for. Well my husband decided to basically take everything out of it, including the filters to see if he could fix it... and that's when we discovered the problem. It was so clogged up with ickiness (not to mention a couple toothpicks, broken glass, and a 2" screw) that I'm amazed it was still able to run at all.

So today's good idea comes from The Quick and The Hungry blog, which I found on pinterest. She gives a great step by step guide on how to clean and maintain your dishwasher. Often times all it takes is a good deep cleaning to get your dishwasher up and running like new again. I've made it a to do now every 6 months to deep clean my dishwasher. I'd highly recommend looking up the manual of your dishwasher (most companies offer the manual in PDF format online) to better locate the filters and how to remove them - The problem we had with ours is that it in fact contained TWO filters, not one, so even though we had cleaned out one, the other remained clogged with gunk.

Monday, April 22, 2013

Edible Color Sugar Glitter

"1/4 cup sugar, 1/2 teaspoon of food coloring, baking sheet and 10 mins in oven to make edible glitter...."


Ok, first off, just no. No. That's a photo of glitter. Just plan old glitter. Now, they do make professional sugar glitter for decorating cakes, but can you make it yourself with just plain sugar and food coloring? 

Ehh... sorta. You see, you can make your own colored sugar, it really is quite easy to do. Just follow the instructions above - food coloring, sugar, and bake at a low temp to help dry the sugar so it doesn't clump. But it's not going to look like glitter, it's going to look like colored sugar. In fact if you're interested, over at the blog The Sweet Adventures of Sugarbelle, she does a great write up on how to make your own color sugar for cookies, cakes and sweets, which you can read more here.


But this pin talks about edible GLITTER, which as pretty as colored sugar is, we can all agree doesn't look sparkly. So how can you get that high sparkle look at home? Not with your everyday sugar. You're best bet would be to buy some sparkling white sugar - which is larger crystals of sugar and not as fine, so it refracts light differently from the more finely ground table sugar. You can see a photo of sparkle sugar over there to the left. If you're feeling REALLY crafty you can even make your own, the same way you would make rock candy. Just boil some water and sugar, stir until well dissolved, add a stick to the jar... and then wait... about a week or so, until the water is gone and the sugar crystals have formed to the stick.  You could also, I believe, dye the sparkling sugar, but a quick search hasn't pulled anything up in regards to that. Since I'm not a baker (you know me and oven fires), sadly, I haven't any on hand to test, so I can't report on if it works well or not. 


So all in all, no, you can't make edible glitter at home with table sugar, food coloring and your oven. 


Friday, March 22, 2013

Good Idea Friday - Refilling your Wallflowers

"Do it yourself refills for any plug-in air freshener. Less expensive and better for your health!"


This idea was submitted to me by at least three different people last week, so it's clearly a hot item over at Pinterest at the moment. But is it a good idea? Bad idea? Honestly - it's a little of both. Not bad enough to put as a bad idea, but flawed enough it's not the best of ideas. Here's why. 

Wallflowers - the ever popular home scent item from Bath and Body Works, are heavy in things like VOC and chemically made scents. Anyone wanting a more natural home will understand why plugging something like that into your outlets to scent the home isn't really all that good. But what about a more natural alternative? As the pin states just use natural oils! 

My first thought when I saw this was that it was fairly sound - simply replacing the artificial scents with natural oils would work. But after spending a bit of time researching I'm not so sure anymore. Over at My Daily Bread, she brings up a lot of good points - mainly that what makes natural oils so nice is also why they aren't commonly used in items like this. Exposure to high heat, air and light will cause the oils to break down. Not to mention the sheer COST that it would take to refill these - essential oils are very costly depending on the scent you're going for. I've seen on other blogs where they recommend mixing it with various other oils and alcohol, but that starts to get in possibly dangerous territory since this is eventually being heated by an outlet, and could pose a fire risk. Different oils have different heat rates at which they can combust, so unless you know the oil you're using is safe to use in this manner it's probably best not to. I'd imagine a light scented oil with a high smoke point would be the safest as they handle heat the best, something like canola (475°F) or safflower oil (510°F) tend to have a high smoke point and are easily accessible.

But that all aside - does this work? Yes, I believe it would. I don't have those in my house to personally test out, but I've read enough blogs and articles about it to make me think this would work. The downside being of course is it's far more costly and not going to be as powerful scented as the artificial ones. 

So what can you do if you want a more natural way to scent your house without having to spend $15 every time you need to refill one plug in? Easy. Long ago, before they had even came up with plug ins, it was fairly common for people to have metal or ceramic rings that they would set on a lamp's light bulb and then fill with oils. Once heated by the lamp, the scent would be released. Why is this better? Because you're only using a small amount of oil at a time, so it doesn't have time to fade or go rancid, and comes with a far lower chance of fire. You can also change the scents easily on a whim. The rings are sold at a lot of different places and tend to run about $5 a piece, so it's also cheaper than the whole wallflower set up is. 

So what do you think? Good idea or bad idea? Any of our fans going to try this for us and report back?  

Wednesday, February 27, 2013

DIY Nail Decals

"wrap a plastic sandwich baggie around a cd and secure. Paint hearts of varying sizes and colors making sure to use a lot of polish so it won't crack when you remove them later. Let dry for 6+ hours. Carefully remove hearts from plastic. Add to your nails using clear polish. Finish with a top coat to seal." 


Ok I will admit two things - first, I'm just as guilty as a lot of people for reopening this idea. It SOUNDS like it would work. Second, this is a bit different from my usual posts in that I don't have a lot of research or data to back this, nor is it all that bad. 

I spent 4 hours yesterday experimenting with this pin. I originally had just set out to do my nails, but as it failed time and time again I realized there was a post to be had with this. 

I started out with 2 forms to try this on - a plastic bag like the pin states, and wax paper. I figured I could try both and see which worked easier. The problem comes about when you look at how nail polish differs from other forms of paint - it's far thinner and binds differently than, say, craft or wall paint does. 

I had started out with 2 colors, done in 2 coats on wax paper. Attempting to peel it off just resulted in crinkled and torn paper. So I tried the plastic baggie. Again, no amount of picking at or scratching was getting the paint to peel off. So I added 2 more coats and let it dry and tried again. It wasn't budging. 2 more coats, letting that dry, and still nothing. I finally gave up and tried another trick that was posted on pinterest - painting your basic scotch tape with nail polish and using that as decals. At first it actually seemed to work - it was far easier to just cut the painted tape into the shapes I wanted (racing stripes, because I like my nails to look like they are going fast) but about an hour later, after being sealed with 4 top coats and a quick drying drops, the edges were starting to peel away from my nails. As I write this, the paint is actually flaking off the tape it's self, despite the top coat and all. 

Over at The Craft Patch though, she seemed to have had better luck than I did with this. Maybe the difference is thickly painted designs verses a large painted patch (I was planning on peeling it off, cutting in stripes, and laying them on my nails like that.)

So what do you think? Good idea or bad idea? Have any of my readers tried this before? Did it work better for you? Comment and let me know! 


Monday, February 18, 2013

Jello Legos

"Wash mega blocks, fill them with jello, and chill. You will have lego jello!" 


Hey look! It's a picture of Jello, in the shape of Legos! What makes people assume that it's as simple as just filling empty legos with jello I will never understand. I have kids - kids have Legos. I've played with them before and took a look at the underside of the blocks - they don't look like just an inverted Lego.

But the pin says Mega Blocks, which we don't have. A quick google search though shows the same thing on the underside of the blocks. There is no way you can just pour Jello in there and get a lego shape. Not to mention the blocks are so ridged that it would be really difficult to get the Jello out once it's set up. 

So how DO you get Lego shaped Jello shown in the pin? With a silicone mold of course! You can order one here at amazon . Those are made by Lego it appears, but there are several other companies that make them as well. And because Pinterest is all about DIYing, here's a great blog write up on how to make your own silicone mold if you're feeling fancy. 


Crafty Corner : DIY Lego Mold